Configuring Email Support / Email Piping
Now that you have installed the Email Support add-on, its time to configure it to collect emails from your support mailbox. To configure your first mailbox, go to the TICKETS->SETTINGS->EMAIL PIPING tab.
The first two sections – Connection Information and Advance Settings relate to your support mailbox. Your support mailbox MUST meet the following rules:
- Be accessible via IMAP or POP3. The add-on does not support proprietary protocols such as Microsoft Exchange (though Microsoft Exchange is supported as long as it’s configured to be accessible via IMAP)
- Be dedicated to support emails
Additionally, it is important that your WordPress server has the IMAP or POP3 ports open (generally 993 and 995 respectively but your email server might use different ports)
Here is an image of the connection information section of the configuration screen: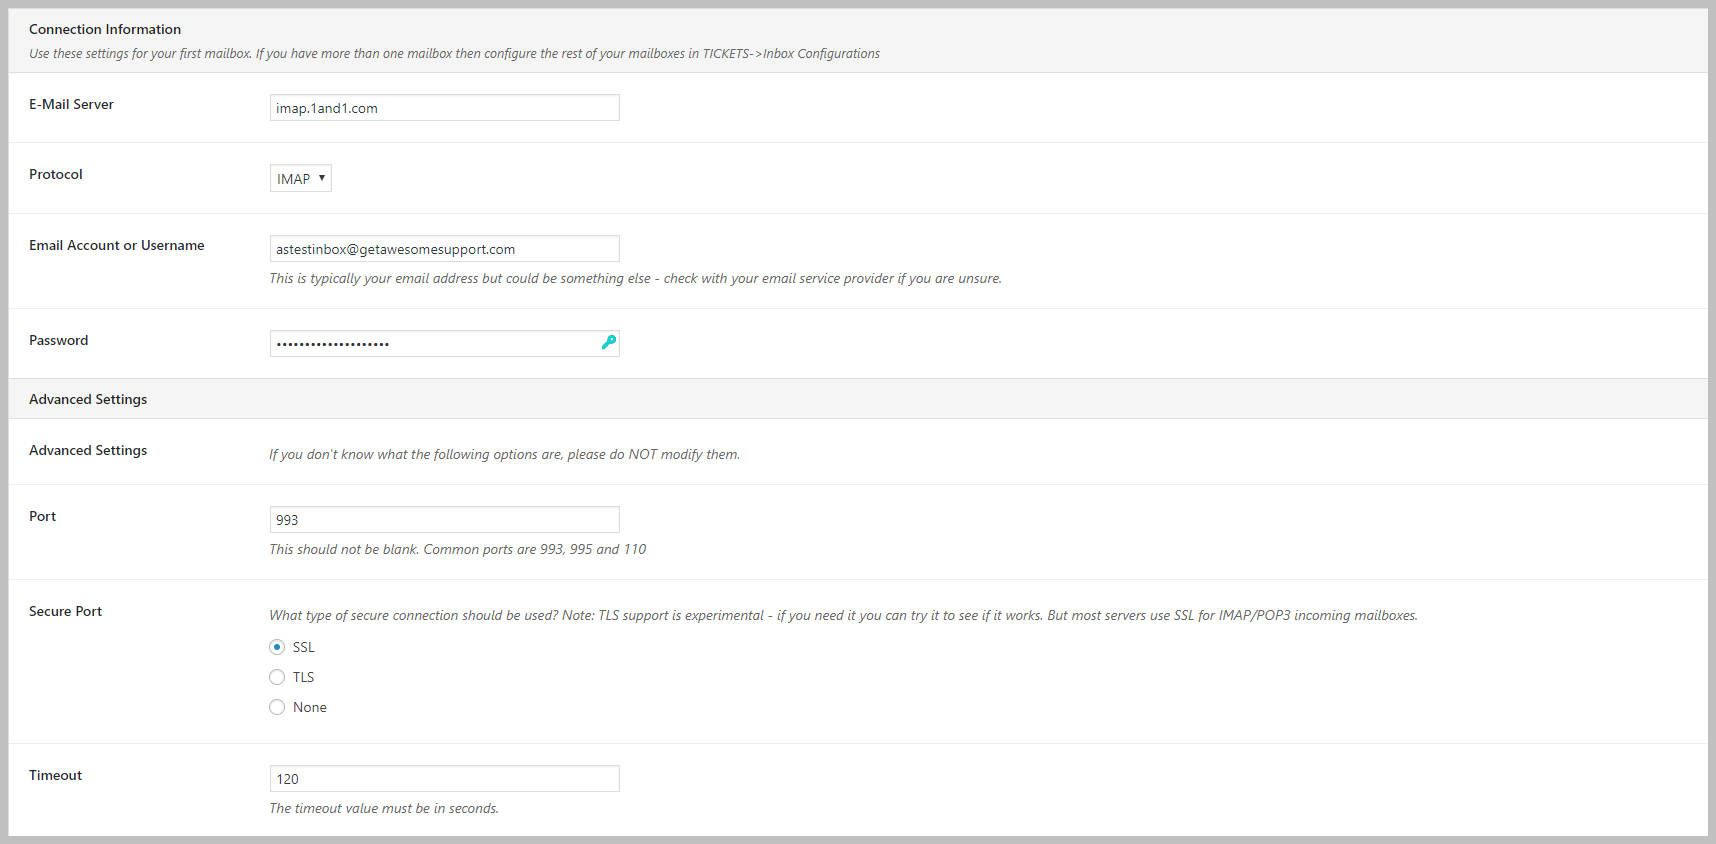
Settings
The Awesome Support E-Mail Add-On has very few settings related to the e-mail provider. If you set up a non-browser based email client in the past then you will immediately recognize the required fields.
Connection Information
These are the basic settings, telling Awesome Support where to go to check the inbox and what credentials to use. The plugin will try to figure out the rest by itself, but if it can’t you might have to change some of the advanced settings.
| Setting | Value |
|---|---|
| E-Mail Server | The address of the e-mail server that you’re using. This usually depends on the protocol you’re going to use |
| Protocol | The protocol to use when connecting to the e-mail server. We recommend using POP3, which most ESPs will support |
| Username | The username to use for logging in the inbox |
| Password | The password to use for logging in the inbox |
With all these settings set Awesome Support should be able to log into your inbox, look for new e-mails, download them into WordPress and delete them from the e-mail server. Once again, the inbox should be dedicated to Awesome Support only.
Advanced Settings
| Setting | Value |
|---|---|
| Port | The port to connect to the e-mail server through |
| Secure Port | Whether or not to use a secured connection to the e-mail server. This is defined by your ESP, it’s not for you to decide |
| Timeout | The delay after which a connection attempt is declared unsuccessful if Awesome Support hasn’t logged-in yet. This item is currently not used but might be used in a future release |
Incompatible E-Mail Providers
None so far.
Settings Examples
Gmail / Google Apps
Please note that Gmail requires you to enable POP3 from your account settings. If you don’t know how to enable POP3 please read this guide from Google.
| Setting | Value |
|---|---|
| E-Mail Server | pop.gmail.com |
| Protocol | POP3 |
| Username | Your e-mail including the @ part (eg. johndoe@gmail.com or john@doe.com) |
| Password | Your account password |
| Port | 995 |
| Secure Port | Yes |
| Timeout | 300 |
Outlook.com / Hotmail / Windows Live Domains
Please note that Outlook.com requires you to enable POP3 from your account settings. If you don’t know how to enable POP3 please read this guide from Microsoft.
While activating POP3, let the app delete the messages by checking “what the device or app says—if it’s set to delete messages, delete them.”. If you don’t select that option, all e-mails will be downloaded every-time Awesome Support checks your inbox.
| Setting | Value |
|---|---|
| E-Mail Server | pop3.live.com |
| Protocol | POP3 |
| Username | Your e-mail including the @ part (eg. johndoe@outlook.com or johndoe@hotmail.com or john@doe.com) |
| Password | Your account password |
| Port | 995 |
| Secure Port | Yes |
| Timeout | 30 |
Yandex
| Setting | Value |
|---|---|
| E-Mail Server | pop.yandex.com |
| Protocol | POP3 |
| Username | Your e-mail including the @ part (eg. johndoe@yandex.com) |
| Password | Your account password |
| Port | 995 |
| Secure Port | Yes |
| Timeout | 30 |
Checking Emails
After you have configured your inbox and tested it successfully using the TEST button, you should scroll down to the bottom of the page to the PIPING SETTINGS section. This is where you will configure how often the add-on should check for emails. Generally we recommend 20 minutes or greater. Smaller intervals are useful for testing and trouble-shooting but for production use 20 minutes or greater is best.
Importing emails automatically depends on WordPress’s CRON process being fired on a regular basis. Unfortunately it only gets fired whenever there is activity on the site (visitors or admin/user logins). So if you have your interval set to 20 mins but no one has used your site for 30 minutes then the email inbox will not be checked. However, once there is activity the email inbox will be checked immediately as WordPress will “catch-up” past-due processes.
More Topics In Email Piping and Support
- E-Mail Support (Introduction)
- Installation (E-mail Piping)
- Creating New Tickets Via Email
- Gmail Considerations
- Handling Replies To Closed Tickets
- Reference: Email Template Tags
- Hooks And Filters (E-Mail Support Add-on)
- Incompatible WordPress Hosts
- Managing Multiple Mailboxes
- Managing Mailbox Rules
- Useful Mailbox Rules
- Handling Unassigned Emails
- Email Support Advanced Topics
- Troubleshooting
- Pre-Built Email Templates
- Email Template Samples
- Switching Email Template Sets