Installation
Installation Instructions For Awesome Support
You have two options for installing Awesome Support.
Option #1: Install Directly From WordPress.ORG
The easiest way to install Awesome Support is from WordPresss.org. Follow these steps:
- In the WordPress Admin dashboard select Plugins->Add new
- You should now see a screen with a list of popular plugins as determined by WordPress.org.
- In the search box on the upper right, type Awesome Support and press the ENTER key.
- You should see Awesome Support listed somewhere in the first row of the search results (usually #1)
- Click the INSTALL button
- Once the installation is finished click ACTIVATE.
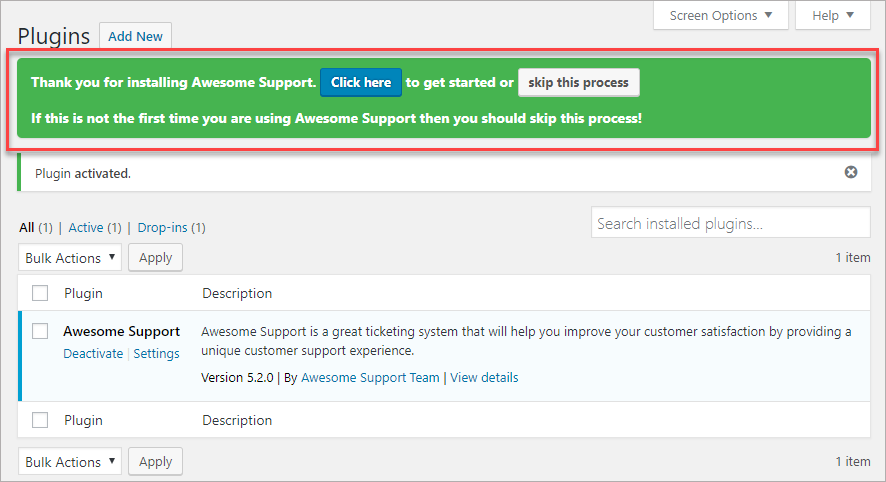
- The plugin is now installed and you should now see an option at the top of the plugin screen to get you started with the configuraton wizard.
Option #2: Install From File
You can download the plugin file directly – either from WordPress.org or from www.getawesomesupport.com. If you have the file, you can upload it to your WordPress installation as follow:
- In the WordPress Admin dashboard select Plugins->Add new
- You should now see a screen with a list of popular plugins as determined by WordPress.org. At the top left is a button labelled Upload Plugin. Click on it.
- You should see a dialog box asking for the plugin file. Navigate to your desktop and choose the file you downloaded in the first step of this procedure then click the Open button at the bottom of the dialog box
- You should now be back in the main Add plugin screen with the filename filled out. Just click the Install Now button.
- If all goes well you will see a new screen with a link that says Activate Plugin. Click on it. That will complete the plugin installation process.
- The plugin is now installed and you should now see an option at the top of the plugin screen to get you started with the configuration wizard.
Completing The Wizard
Once the plugin has been installed and activated, there will be an option at the top of the plugins screen to get you started with a configuration wizard. Click the blue CLICK HERE button to get started.
When you click that button you will be immediately presented with a configuration “wizard” screen. Follow the instructions on the screen to configure your menus, products, departments and more:

Time Saving Tip: Make sure you have at least one menu already configured in your WordPress APPEARANCE->MENUS screen. Otherwise you will have to exit the wizard to create a menu and then start the wizard all over again.
Troubleshooting
If you get a “directory already exists” error message, you will need to use FTP to upload the updated plugin to the folder that already exists. Check with your hosting provider for instructions on how to use FTP to upload files. Please make sure you “unzip” the plugin files before uploading them via FTP. Alternatively, you can go to the PLUGINS screen and delete the existing plugin before starting the upload process all over again as described above.
Watch the video
The video below will show you some of the installation process. Unfortunately its based on an earlier version of Awesome Support that did not have the initial configuration wizard. However, it does cover some post installation steps that might be useful such as adding an agent.
More Topics In Awesome Support Core
- Awesome Support
- How To Create A Ticket On Behalf Of The Client?
- What's New In Awesome Support
- Post Installation – What You Need To Know (Quick Start)
- Post Installation - Enter Your First Ticket (As A Customer)
- Post Installation: Adjust Security
- Basic Admin: Add An Agent
- Basic Admin: Turn Off Ticket Assignment To An Agent
- Agent Functions: Manage The Ticket List
- Using POEDITOR.COM For Translations
- Agent Functions: View All Tickets
- Agent Functions: Navigate To A Ticket (View Ticket)
- Agent Functions: Explore The Ticket Interface
- Agent Functions: Reply To A Ticket
- Agent Functions: Close A Ticket
- Agent Functions: Add An Internal Note (Premium)
- Agent Functions: Track Time Spent On A Ticket (Basic)
- WPML and POLYLANG
- ADMIN: Overview
- ADMIN: User Registration Options
- ADMIN: Configure Products
- ADMIN: Synchronize Products With WooCommerce And Easy Digital Downloads
- ADMIN: WooCommerce Integration (Basic)
- ADMIN: Configure Departments
- ADMIN: Configure Email Alerts
- ADMIN: Email Template Sets
- ADMIN: Configure Priorities
- ADMIN: Configure Channels
- ADMIN: Configure Status Colors
- ADMIN: Short Codes And Pages
- ADMIN: Multiple Agents Per Ticket
- ADMIN: Basic Time Tracking
- ADMIN: Misc Display Options For Agents and Admins
- ADMIN: Misc Display Options For Customers (Front-end Users)
- ADMIN: Misc Display Permissions
- ADMIN: Misc Display Options (Advanced)
- ADMIN: File Upload Options
- ADMIN: Deleting Attachments (Manual and Automatic)
- ADMIN: Advanced System Options
- ADMIN: Audit Trail Options
- ADMIN: Handling Existing Users After Installation
- ADMIN: Roles And Capabilities
- Roles and Capabilities Table
- ADMIN: Roles And Capabilities In Add-ons
- ADMIN: WP-CONFIG Options
- ADMIN: Multiple Ticket Forms
- ADMIN: Multi-Vendor Marketplaces
- Multisite Considerations
- Known Plugin Incompatibilities and Conflicts
- Cookies