ADMIN: Misc Display Options For Agents and Admins
Awesome Support includes a number of configuration options to control the size of display lists for administrators and agents as well as other useful misc global display options. To access and update these:
- Go to the TICKETS->SETTINGS->GENERAL tab
- The first section is labeled GENERAL ADMIN AND AGENT OPTIONS – this is where most of the display options are set for the wp-admin tickets area
- Turn on or off items as needed in that section – see below for what each item does.
- Don’t forget to click the SAVE CHANGES button!
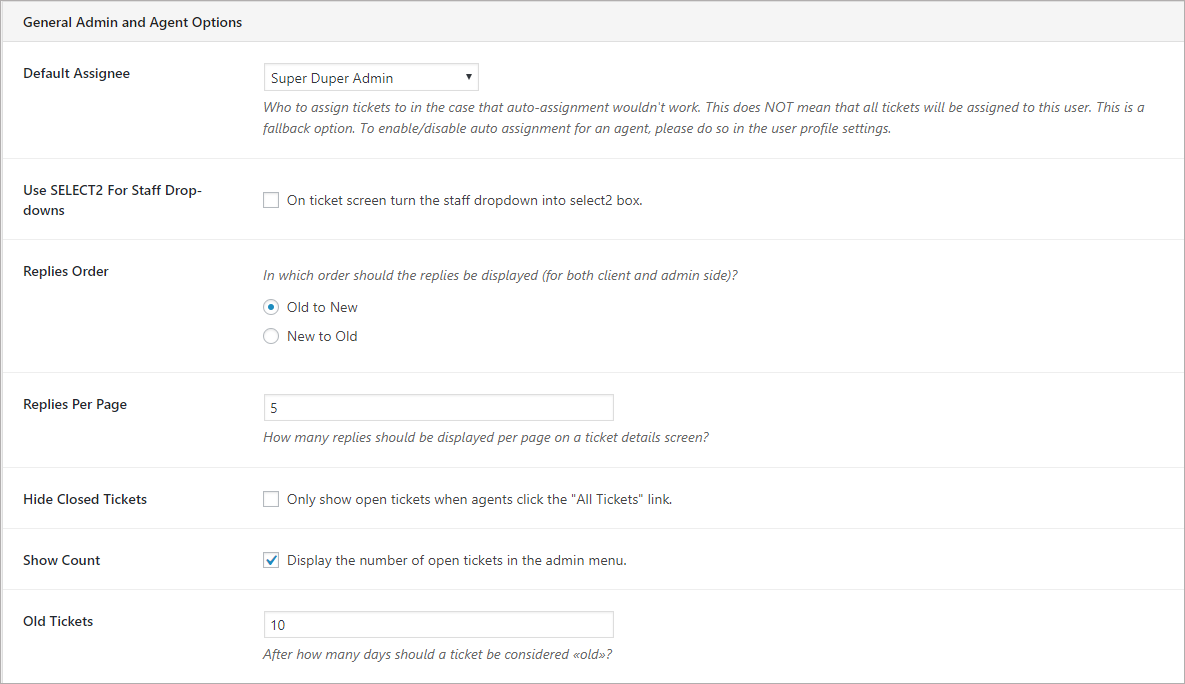
- Default Assignee: If an agent cannot be determined for a ticket through any other process, then the agent specified in this field will be used for the ticket.
- Use SELECT2 For Staff Dropdowns: Agent drop-downs are currently rendered like normal Windows drop-down fields. However, if you have a lot of agents, then it can be inefficient to create that drop-down. In that case you can use a type of drop-down called SELECT2. With this drop-down the user has to type the first three characters of an agents name in order to see a list of matching agents.
- Replies Order: Should replies be shown from old to new (old at the top) or new to old (newer replies at the top)?
- Replies Per Page: This is probably self explanatory as well – how many replies should be shown before you see the page controls – forcing you to click to see additional replies?
- Hide Closed: Should closed tickets be hidden by default?
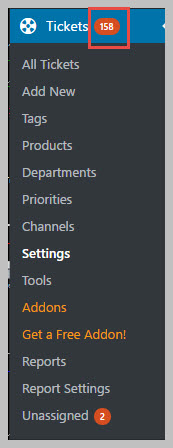
- Show Count: Should a count be shown on the admin TICKETS menu – it will look something like this if turned on:
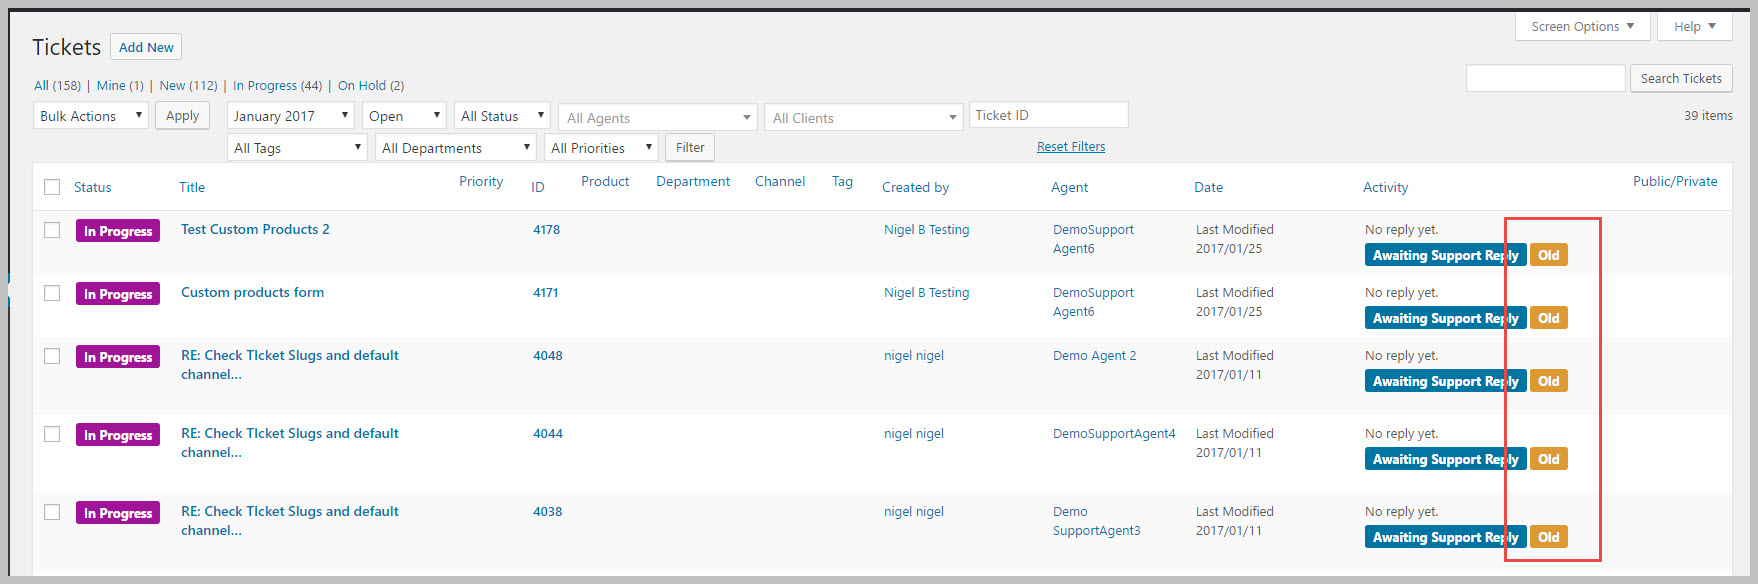
- Old Tickets: How many days should pass before a ticket is considered “old”? This affects whether or not an “old” tag is shown in the ticket list. This is what that tag looks like in the ticket list:
More Topics In Awesome Support Core
- Awesome Support
- How To Create A Ticket On Behalf Of The Client?
- What's New In Awesome Support
- Installation
- Post Installation – What You Need To Know (Quick Start)
- Post Installation - Enter Your First Ticket (As A Customer)
- Post Installation: Adjust Security
- Basic Admin: Add An Agent
- Basic Admin: Turn Off Ticket Assignment To An Agent
- Agent Functions: Manage The Ticket List
- Using POEDITOR.COM For Translations
- Agent Functions: View All Tickets
- Agent Functions: Navigate To A Ticket (View Ticket)
- Agent Functions: Explore The Ticket Interface
- Agent Functions: Reply To A Ticket
- Agent Functions: Close A Ticket
- Agent Functions: Add An Internal Note (Premium)
- Agent Functions: Track Time Spent On A Ticket (Basic)
- WPML and POLYLANG
- ADMIN: Overview
- ADMIN: User Registration Options
- ADMIN: Configure Products
- ADMIN: Synchronize Products With WooCommerce And Easy Digital Downloads
- ADMIN: WooCommerce Integration (Basic)
- ADMIN: Configure Departments
- ADMIN: Configure Email Alerts
- ADMIN: Email Template Sets
- ADMIN: Configure Priorities
- ADMIN: Configure Channels
- ADMIN: Configure Status Colors
- ADMIN: Short Codes And Pages
- ADMIN: Multiple Agents Per Ticket
- ADMIN: Basic Time Tracking
- ADMIN: Misc Display Options For Customers (Front-end Users)
- ADMIN: Misc Display Permissions
- ADMIN: Misc Display Options (Advanced)
- ADMIN: File Upload Options
- ADMIN: Deleting Attachments (Manual and Automatic)
- ADMIN: Advanced System Options
- ADMIN: Audit Trail Options
- ADMIN: Handling Existing Users After Installation
- ADMIN: Roles And Capabilities
- Roles and Capabilities Table
- ADMIN: Roles And Capabilities In Add-ons
- ADMIN: WP-CONFIG Options
- ADMIN: Multiple Ticket Forms
- ADMIN: Multi-Vendor Marketplaces
- Multisite Considerations
- Known Plugin Incompatibilities and Conflicts
- Cookies
Search