9 Cool Things You Can Do With The Email Support Addon
Version 5.0 of the Email Add-on brings new power to your help desk operations - especially if most of your tickets or replies are managed via email. So here are 9 very cool things you can do with this add-on:
1. Set up dedicated mailboxes
The Email Support add-on can retrieve mail from multiple mailboxes. This means that you can set up dedicated mailboxes for:
- Individual departments
- High volume products
- VIP customers
For each mailbox you set up you can specify the department, product, priority, channel, status, public/private flag and other attributes for each new ticket created from the inbox.
To set up a new mailbox
- First you should create the actual mailbox in your email provider dashboard
- Next, go to TICKETS->INBOX CONFIGURATIONS and click the New AS Mailbox Configuration button at the top of the mailbox list
- Fill in the information requested - don't forget to check the ACTIVE flag.
- Click the PUBLISH or SAVE button on the upper right of the screen.
Send a new email to your new inbox and test by using the FETCH MAILS button in the top bar of your screen. If everything was set up correctly you should see a new ticket with the DEPT/PRODUCT/STATUS/PRIORITY all filled in with your defaults.
Learn more about setting up multiple mailboxes
2. Create custom commands
The add-on has the ability to create pass/fail rules that are applied to each email. Rules can be based on the content of the subject, body or email address of the incoming email. An example of a custom command would be {{close}}. When an email is received with this text in the subject line, the ticket will automatically be closed.
To create this custom command:
- Go to TICKETS->INBOX RULES
- Click the New Inbox Rule button at the top of the rules list
- Give the rule a name by filling in the field labeled ENTER TITLE HERE.
- Leave the Rule Type as normal.
- In the RULE field enter {{close}}. This is the text that will be searched for.
- Click the Is Rule Active checkbox to turn the rule on.
- In the ACTION field select the Close The Ticket option.
- Click the PUBLISH or SAVE button in the upper right of the screen.
Now send an email reply to an existing ticket - make sure you include {{close}} as part of the subject line. If all is configured correctly the ticket should automatically be closed!

3. Create New Users Automatically
Sometimes users will simply send an email to your support email address. If you allow this then you might want to make sure that the tickets aren't rejected because the email address isn't recognized. You can, instead, create a new user for unrecognized email addresses.
To make this happen:
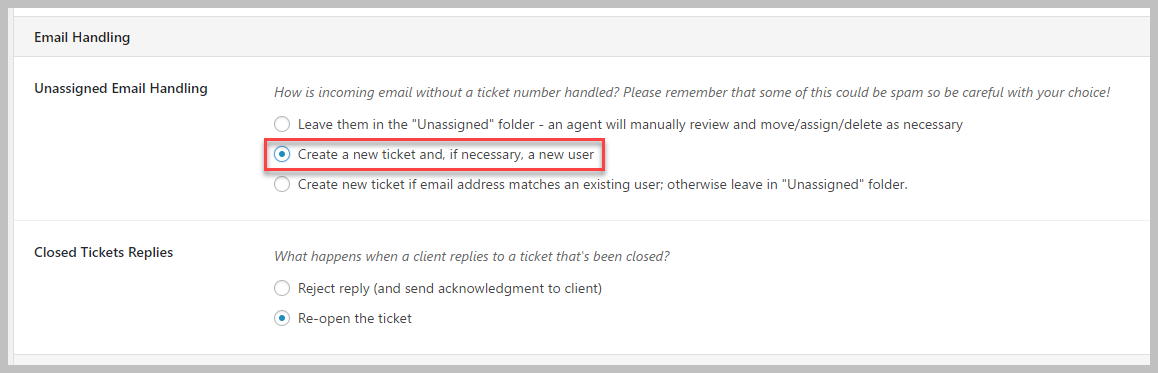
- Go to the TICKETS->SETTINGS->EMAIL PIPING tab
- Scroll down to the EMAIL Handling section
- In the options for Unassigned Email Handling, choose the second option - Create a new ticket and, if necessary, a new user.
New users will now be created if an email address is not recognized.
4. Prevent Users From Replying To Closed Tickets
Sometimes users will reply to a closed ticket and, in some cases to tickets that are really old. For most operations this is not desirable.
To reject replies to closed tickets
- Go to the TICKETS->SETTINGS->EMAIL PIPING tab
- Scroll down to the EMAIL Handling section
- In the options for Closed Tickets Replies, choose the first option - Reject reply.
Replies to closed tickets will now be rejected. You can configure the contents of the rejection notice under TICKETS->SETTINGS->EMAILS.

5. Reject Out Of Office Replies
There are times when your support system might send a notice to a customer only to get an automated "out of office reply". For example, when a ticket is automatically closed because of a lack of activity, an email might be sent to the client. If the client has an automated response set up, then it will send an email back to your support system which would then trigger an email back to theirs ultimately ending up in an infinite loop. Rejecting out of office replies is one way to reduce the chances of this occuring.
You will use EMAIL RULES to trigger this behavior:
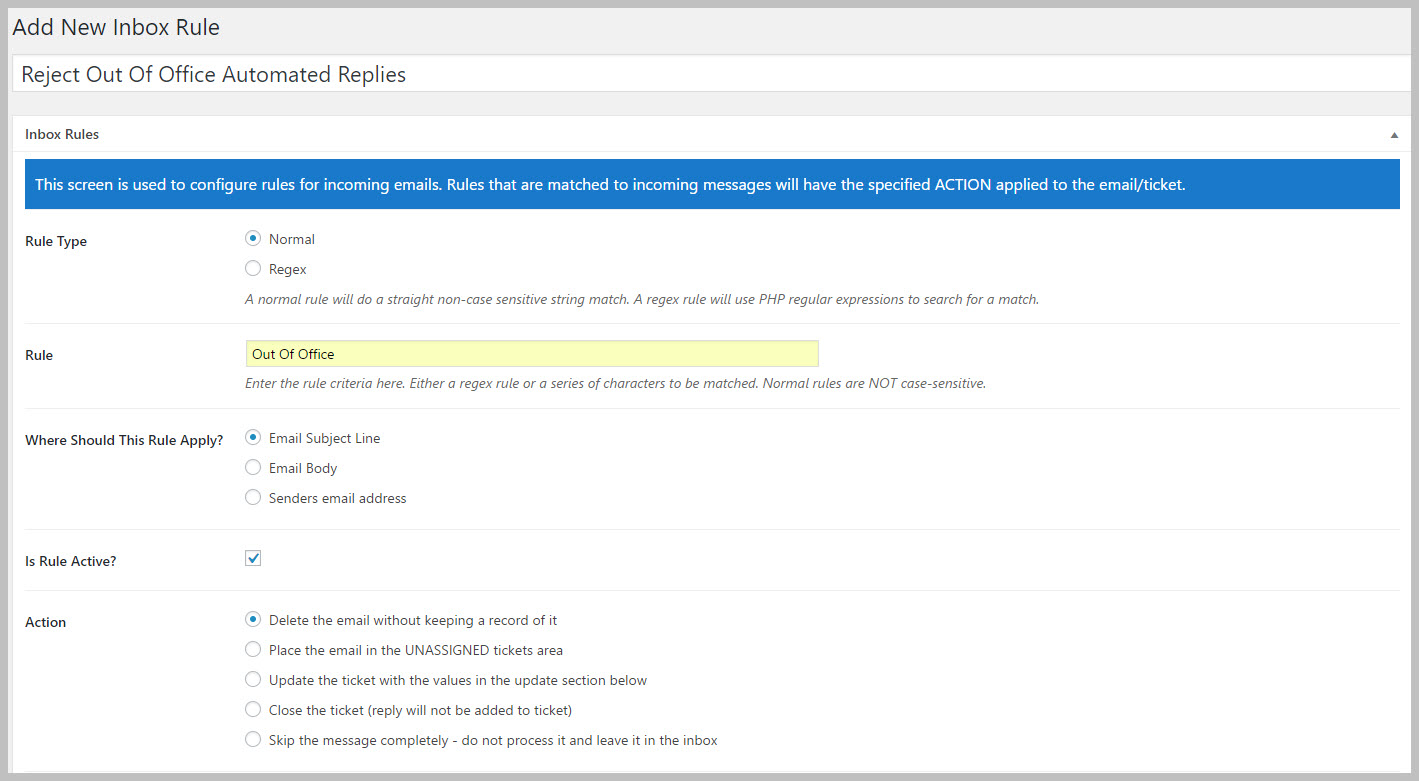
- Go to TICKETS->INBOX RULES
- Click the New Inbox Rule button at the top of the rules list
- Give the rule a name by filling in the field labeled ENTER TITLE HERE.
- Leave the Rule Type as normal.
- In the RULE field enter Out Of Office. This is the text that will be searched for.
- Click the Is Rule Active checkbox to turn the rule on.
- In the ACTION field select the Delete the email without keeping a record of it option.
- Click the PUBLISH or SAVE button in the upper right of the screen.
Now any email received with the text "out of office" in the email subject line will simply be deleted.
6. Use Any Contact Form To Create A New Ticket
Awesome Support has built-in support for Gravity Forms via the Gravity Forms bridge add-on. However, you might prefer to use a different form builder. As long as that form builder can send an email on behalf of the person filling in the form you can use it to automatically create a ticket when the form is submitted.
This articles shows how you can use a form builder to set up a contact form to automatically create a ticket via email.
7. Automatically Escalate A Ticket
Here's a scenario - lets assume that you have sent out an email informing users about a product recall. Users that reply to that email should have a new ticket created that is automatically escalated. With multiple mailboxes it is almost a trivial task to create this workflow.
- First make sure you have a status configured for the escalated tickets.
- Next, go to TICKETS->INBOX CONFIGURATIONS and click the New AS Mailbox Configuration button at the top of the mailbox list
- Give the mailbox configuration a name by filling in the field labeled ENTER TITLE HERE.
- Fill in the information requested - don't forget to check the ACTIVE flag.
- It is important that the mailbox you're connecting to is the one that is the default the user sees when replying to the product recall notice
- Make sure you set the default status to the one you configured in the first step
- Click the PUBLISH or SAVE button on the upper right of the screen.
Now, any emails received in the new inbox will automatically create a ticket with the specified status.
8. Automatically Escalate A Ticket - Alternative Method
The rules engine in the Awesome Support email add-on is very powerful and it is featured once again in this tip. Using the same scenario in #7 above, we can instead use the rules engine to set a PRIORITY level.
- Go to TICKETS->INBOX RULES
- Click the New Inbox Rule button at the top of the rules list
- Give the rule a name by filling in the field labeled ENTER TITLE HERE.
- Leave the Rule Type as normal.
- In the RULE field enter Recall (or whatever other key word is in your email subject line) This is the text that will be searched for.
- Click the Is Rule Active checkbox to turn the rule on.
- In the ACTION field select the Update the ticket with the values in the update section below option.
- In the UPDATE section, choose the PRIORITY that will be used.
- Click the PUBLISH or SAVE button in the upper right of the screen.
9. Tag Tickets As Private If An Email Contains Credit Card Information
The Public Tickets add-on has an option that automatically make tickets publicly searchable. If this is turned on then any emails received will create tickets or replies that are automatically made public - even if it contains sensitive information such as credit card numbers. However, we can use the email rules engine to turn those tickets private if it contains such sensitive information.
In order to make this work you need to understand a bit about REGEX rules since we'll be using that option in our rules to identify potential credit card data in incoming emails. This article contains information about REGEX rules and credit card formats. Note that you'll have to convert the regex rules used in that article to ones that are compatible with php's preg_match function.
Anyway, for the purpose of this example lets create a a simple rule to identify emails that contain 16 digit credit card numbers:
- Go to TICKETS->INBOX RULES
- Click the New Inbox Rule button at the top of the rules list
- Give the rule a name by filling in the field labeled ENTER TITLE HERE.
- Leave the Rule Type as Regex.
- In the RULE field enter an appropriate regex rule to identify possible credit card string formats. For the purpose of this example we will use: /[0-9\.\-]{4}-[0-9\.\-]{4}[0-9\.\-]{4}[0-9\.\-]{4}/
- This rule matches nnnn-nnnn-nnnn-nnnn formats. Obviously its not comprehensive but this is just an example.
- For the Where Should This Rule Apply option choose Email Body
- Click the Is Rule Active checkbox to turn the rule on.
- In the ACTION field select the Update the ticket with the values in the update section below option.
- In the UPDATE section set the New Public/Private flag option to Private.
- Click the PUBLISH or SAVE button in the upper right of the screen.
Now, any emails received in that contain credit card information will be made private.
That's a Wrap
As you can see, the email add-on is very very flexible and can do a lot of things to filter out noise and make your support operations run smoother. Let us know of any cool tricks or workflows that you have created with this add-on.
THREE EASY WAYS TO GET STARTED WITH AWESOME SUPPORT TODAY!
Purchase A Bundle
Download Free Plugin
Install From WordPress.org