
Send SMS Ticket Alerts (Using Twilio And Zapier)
Introduction
You can set up Awesome Support to send SMS messages to one or more phone number when various events occur. To do this you can use our Rules Engine addon to send data to Zapier which in turn will forward the data to an SMS service named Twilio.
Twilio provides SMS services in most countries around the world and is one of the most commonly used service providers for application SMS. But, as with most SMS sending services, you will incur a small charge for every SMS sent. Please make sure you read the Twilio pricing guide so you know what you will be charged - some jurisdictions will cost less than a penny but others will cost much more.
Getting Started
To get started you need these four things:
- Awesome Support 5.7.1 or later already installed on your WordPress site
- The BUSINESS RULES ENGINE add-on for Awesome Support (Premium)
- A Zapier account (Premium)
- A Twilio account (premium)
You will notice that sending SMS messages requires payment for every service involved - unfortunately sending SMS simply isn't free.
So, before you get started please make sure you sign up for a Zapier and a Twilio account.
Additionally, please make sure that you have set up phone numbers for your agents and users in their WordPress user profile under the section Awesome Support: Additional User Data. If you only want agents to receive SMS notifications then you do not need to set up phone numbers for your users.
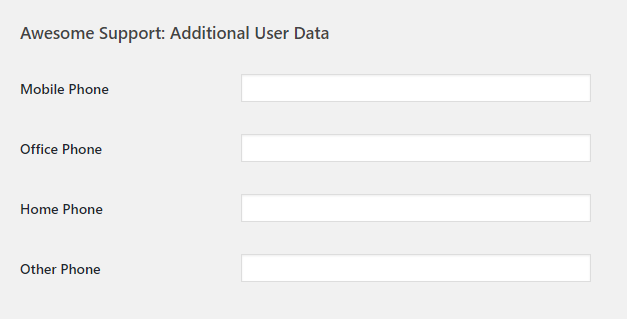
When entering the phone numbers in the user profile, you must enter the country code as well - even for US numbers. That means "+1xxxyyyzzzz" for US numbers.
Understanding The Data Flow
The way the data flow works is like this: when a ticket is received, the Awesome Support Business Rules Engine will send the ticket contents to Zapier.
Zapier in turn will connect to Twilio and hand off the pieces of the ticket data that Twilio needs to construct and send an SMS message.
It is conceptually pretty simple but does require a few steps to get all the pieces working together. We recommend that you read the rest of this document at least once through before starting to configure your site.
Step 1: Create An App In Twilio
Assuming you have already created a Twilio account, log into your dashboard. Click your ID in the upper left hand side of the dashboard and choose Create New Project from the dropdown.
Select the PRODUCTS button, then select Programmable SMS and finally click the Continue button at the bottom of the screen.
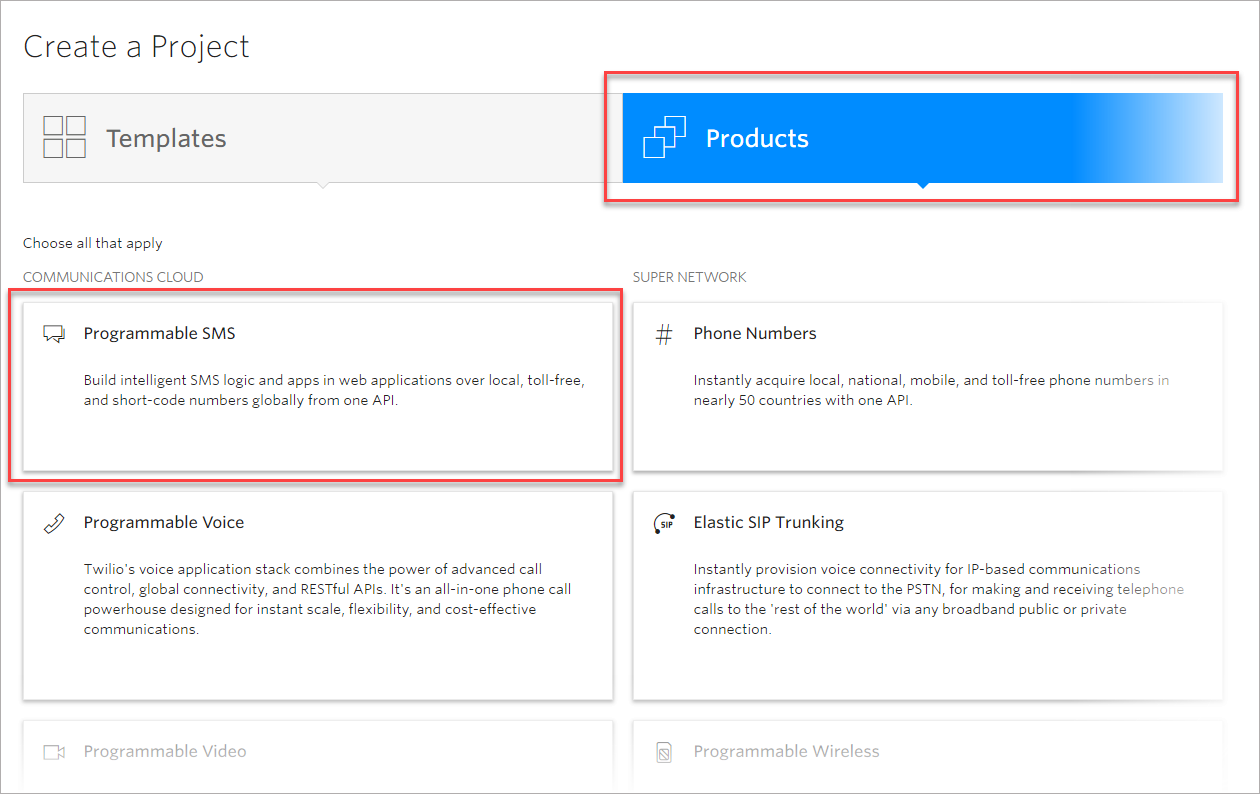
- Give the project a name such as Awesome Support SMS and click the Continue button.
- In the teammates screen just click the Skip This Step button. You should now be at the project dashboard.
- On the left hand side is a Settings menu option. Choose that and you will see your test and live credentials. Make a note of the LIVE credentials since you will use it when you connect to Zapier.
- Finally, if this is your first time using Twilio you must upgrade your account so you can buy a phone number from which text messages will be sent. Sending SMS messages is not free but the cost per message can be a penny or less in some regions of the world.
Step #2: Set up a skeleton zap in Zapier
This skeleton Zap allows us to get the "hook" needed for configuring the business rules engine and linking it to Zapier.
- Log on to Zapier
- Click the bright orange button at the top of the screen labeled MAKE A ZAP
- In the list of apps that is shown select WEBHOOKS. If Webhooks isn’t shown, search for it in the search box and then select it
- Click on the radio button labeled CATCH HOOK and then click the blue SAVE + CONTINUE button.
- When presented with the PICK Off A Child Key option, skip this for now and click the CONTINUE button.
- You will be presented with a url that is the “hook”. Copy it to your clipboard and store it in a notepad so that you can use it in the step below.
Step #3: Set up the Ruleset
Now that you have a webhook from Zapier you can tell the ruleset about it.
- Create a new RULESET (AS RULESET->ADD NEW RULESET)
- Select NEW TICKET as the trigger
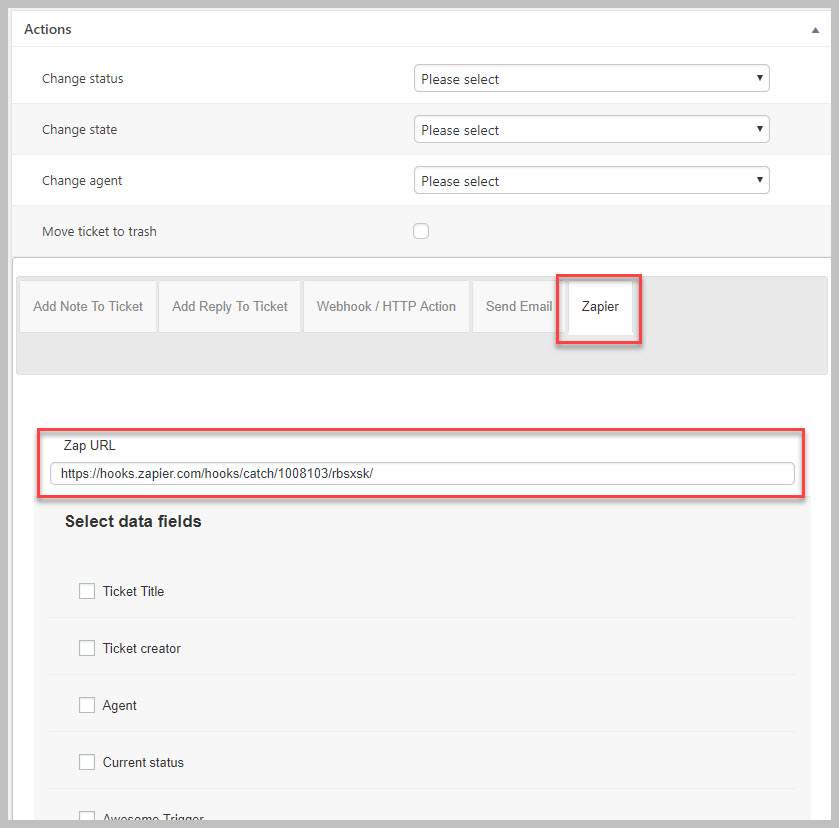
- In the actions section at the bottom of the screen click the ZAPIER tab
- In the ZAP URL field enter the webhook you retrieved
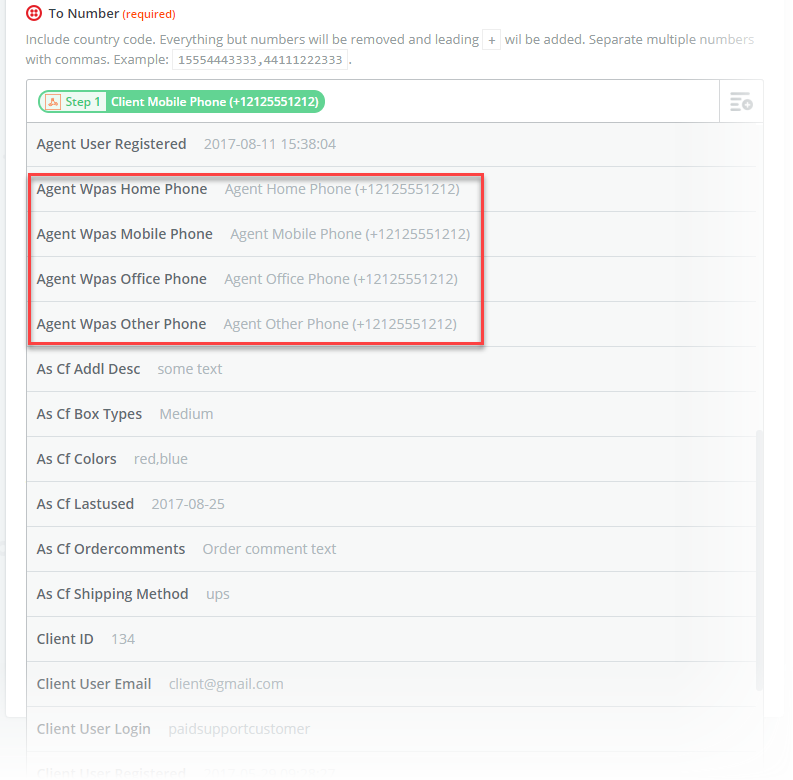
- Check off the data fields you would like to send to Zapier - we generally just choose them all but at the very least you will want to choose the phone number fields.
- Click the UPDATE or PUBLISH button
- Scroll back down and click the SEND TEST ZAP button.
Step #4: Continue Setting Up Data in Zapier
- Switch back over to your Zapier screen and then click the OK, I DID THIS button. Zapier will search for the test data being sent
- If Zapier finds the test data sent it will give you a TEST SUCCESSFUL message and you can then click the CONTINUE button.
Step 5: Add a Zapier Step To Connect To Twilio
At this point you should still be in Zapier with the trigger step completed. Now, click the Add A Step button.
In the search box type Twilio and choose Twilio from the results.

Once selected, you'll see an option to SEND SMS. Select it and click the Save+Continue button.
You will then see an option to either select an existing Twilio Account you've already connected or to connect to a new one. Most users will need to connect to a new one which will pop up a window to enter the Twilio credentials.
In the pop-up window, enter the Account Auth Token and Sid you retrieved earlier when you created a Twilio Project. Then click the Yes, Continue button at the bottom. This will close the pop-up window and return you to the main window.

Click the Test button to make sure everything is ok and then click the Save+Continue button.
Step 4: Supply The SMS Information
Now you need to provide Zapier the SMS information to hand-off to Twilio:
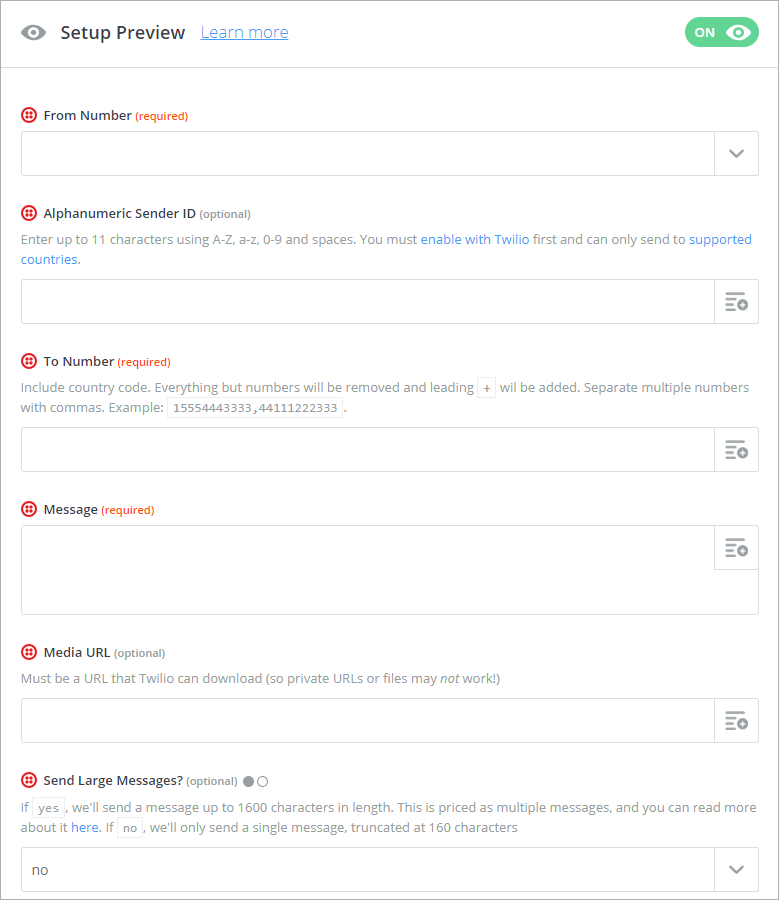
From Number: Click the + sign to load all the phone numbers in your Twilio account. Choose one of them (if this is the first time you're setting this up chances are you only have one phone number)
To Number: Click the + sign and select a field that contains the phone number to you wish to send to. The field must contain a FULL phone number that starts with the country code - for the US that would be"+1". You should see phone numbers from the user and agent profiles. Depending on the ticket event you're trapping you might choose an agent phone number or a user phone number.
To Message: Enter a direct text message or click the + sign and select a field that contains the message you want to send. Generally this will be the ticket or reply contents. Or you can create a generic message such as "A new support ticket was created". You can combine generic text with ticket fields to create a message such as "A new support ticket was created:" <insert ticket title field> - which might look something like this:
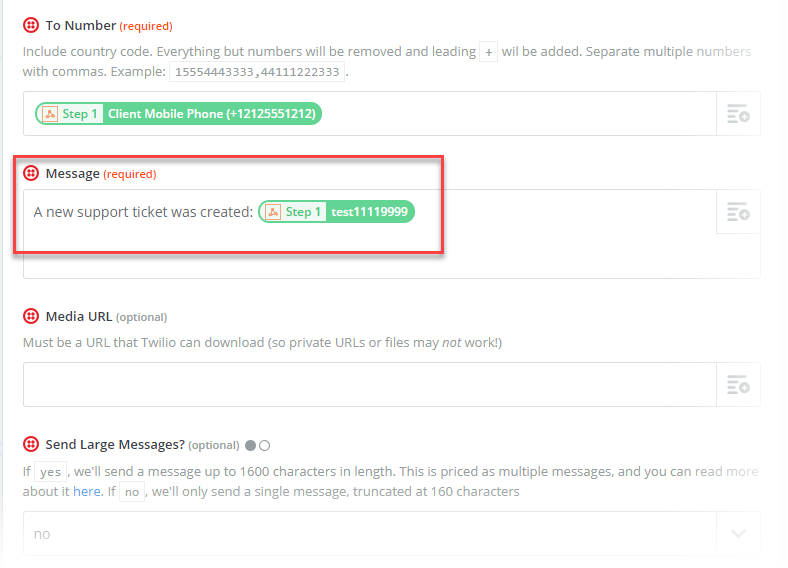
Fill out the other fields as you see fit then click the Continue button.
You should now be on a confirmation screen with two options - send a test message or SKIP TEST. Generally, you would need to click on SKIP TEST since you don't already have any data to send. Then click the FINISH button.
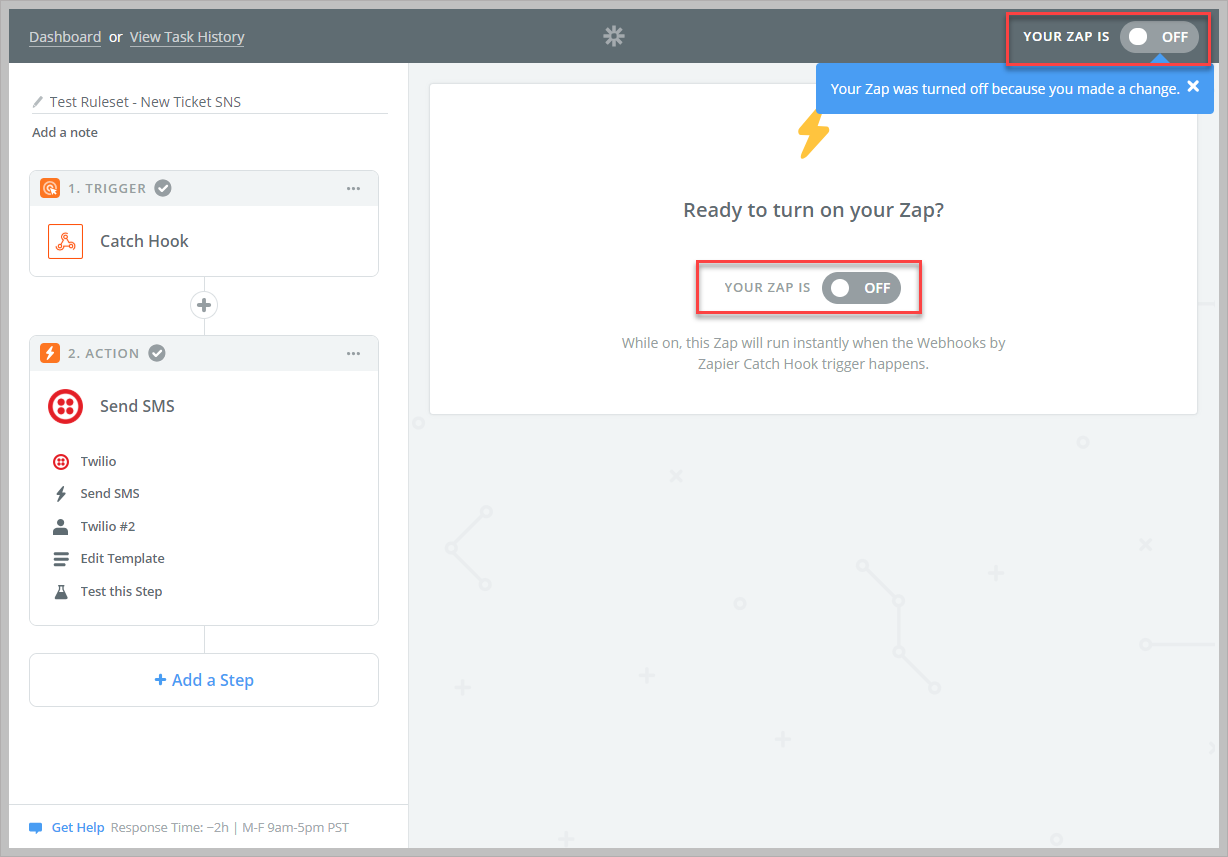
Finally, turn on the Zap by clicking the radio button in either of the areas shown in the red box in the image below:
Step 4: Test Your Connection
Submit a new ticket and see if you get a new SMS message. Of course, you want to use a user or that has provided their phone number. As mentioned before, phone numbers are held in the user or agent profile.
Final Tips
If you want to send SMS messages to both the end user and the agent for the same event, you can either create another Rule Set and Zapier integration OR you can add another Zapier STEP that connects to Twilio again.
In many cases you will need to create multiple Rules integrated with Zapier. This is because you might send one set of SMS notifications for New Tickets and another set for New Replies from Clients and yet another set for New Replies From Agent.
THREE EASY WAYS TO GET STARTED WITH AWESOME SUPPORT TODAY!
Purchase A Bundle
Download Free Plugin
Install From WordPress.org