
An EXTENSIVE and In-depth Awesome Support Review
We recently commissioned a research study on Help Desk plugins by hiring an experienced WordPress plugin reviewer to provide in-depth reviews of the top 8 WordPress Help Desk plugins. Of course, Awesome Support was included in the review. Below is the Awesome Support excerpt from the WordPress Helpdesk Ticketing Plugins 100 page e-book.
Note: The start of the review will sound a bit unusual but that's because its an excerpt of a far larger body of work that spans about 100 pages.
Last, but by no means least, is Awesome Support. Like some of the previous offerings, Awesome Support is a free core plugin with a variety of premium addons that tack on additional functionality.
As with the previous plugins, we’re going to look at Awesome Support as it functions with all addons enabled. Given the massive 21 available addons, covering a range of functionality, this is somewhat of a mammoth task. Let’s dig in and knock out the final entry in our comparison.…
Ticket Creation Process
Like the others, Awesome Support lets you create tickets:
- With front-end forms
- Manually via the backend
- Via email piping
But Awesome Support takes things a little further by giving you full flexibility over how your front-end forms work.
Let’s start with custom fields...Awesome Support lets you choose from 11 different possible custom field types, including helpful advanced options like taxonomies and password fields.
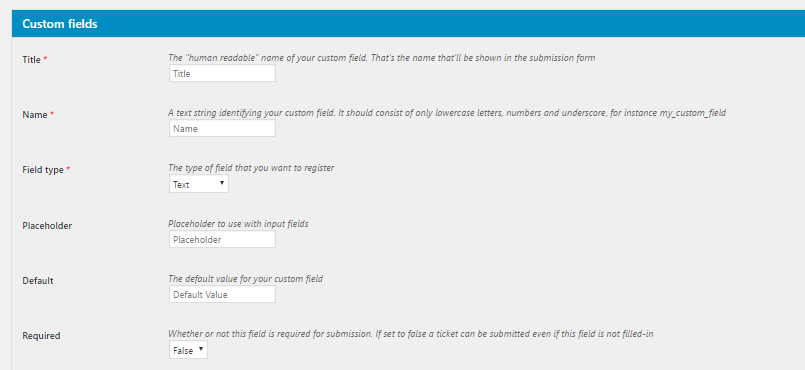
Beyond just adding custom fields like some of the other plugins, Awesome Support also gives you a good deal of added flexibility here by letting you do things like:
- Setting permissions for each custom field
- Setting defaults for each field
- Specifying whether a field is required or not
- Specifying validation rules (based on HTML 5 syntax)
- Specifying whether a field is viewable by a customer or just an agent
- Specifying whether changes to a field should be logged on a ticket – great for audit trails!
- Controlling whether the field can be viewed in the main ticket list and whether it can be used to sort and filter the list
- Easily adding fields programmatically in 3rd party plugins or theme custom code
In fact, about the only thing missing is conditional fields. At first, it seems like an omission. But Awesome Support actually gives you something far more flexible here…
Custom Forms
Like the other plugins, Awesome Support includes a single help desk form and all custom fields are shown on that form. And, at first glance, it might seem that there is no ability to create other forms – which would be the functional equivalent to other plugins.
Instead of building yet another form builder, Awesome Support opted to sync up with one of the most popular form builders out there – Gravity Forms.
With this connection, you can create as many custom ticket forms as you need and link Gravity Forms fields to the custom fields you created in Awesome Support. And you can also take advantage of all the core Gravity Forms functions like user registration, Zapier integrations, and more.
And because Gravity Forms includes sophisticated options for conditional processing and hooks into the WordPress API, it’s easy to control how tickets are assigned and who they are assigned to (more on this later).
By hooking up with Gravity Forms, you have a great deal more flexibility than pretty much all the other plugins in our comparison.
Standard Forms
Even if you don’t use Gravity Forms, you still have a good deal of control over the standard ticket form. For example, you can:
- Add custom fields
- Remove existing fields such as Department and Product
- Change the labels for existing fields
- Add text to the top and bottom of the form
- And, with some simple CSS, hide sections of the form that you do not want.
Ticket Organization - Initial and Post-Ticket Creation
Whereas with most of the other help desk plugins you get somewhere between zero and one ticket assignment algorithms, Awesome Support ships with five separate algorithms that you can use to define how tickets are assigned.
By default, tickets are assigned to the agent with the least number of open tickets. But with more advanced algorithms, you can:
- Give agents specific working hours (none of the other plugins offer this)
- Assign agents to specific departments
- Assign agents to specific products
With that data, you can then choose from algorithms like:
- Look for an agent who supports product X and is currently on duty
- IF NO AGENT IS FOUND - look for any agent who is working regardless of product or department.
- and so on…
With five separate algorithms, you can find the specific uses that work for you.
As far as we know, no other WordPress help desk plugin offers such detailed ticket assignment.
Once a ticket is assigned, you have a few different built-in ways to filter and organize tickets. By default, you can use:
- Tags
- Products
- Channels (where the original ticket request came from - e.g. Facebook Message)
But as mentioned in the custom fields section above you can also make any of your custom fields:
- Filterable
- Sortable
- Display as a column in your ticket listing screen
So really - you have full control over every single column that appears on your ticket list.
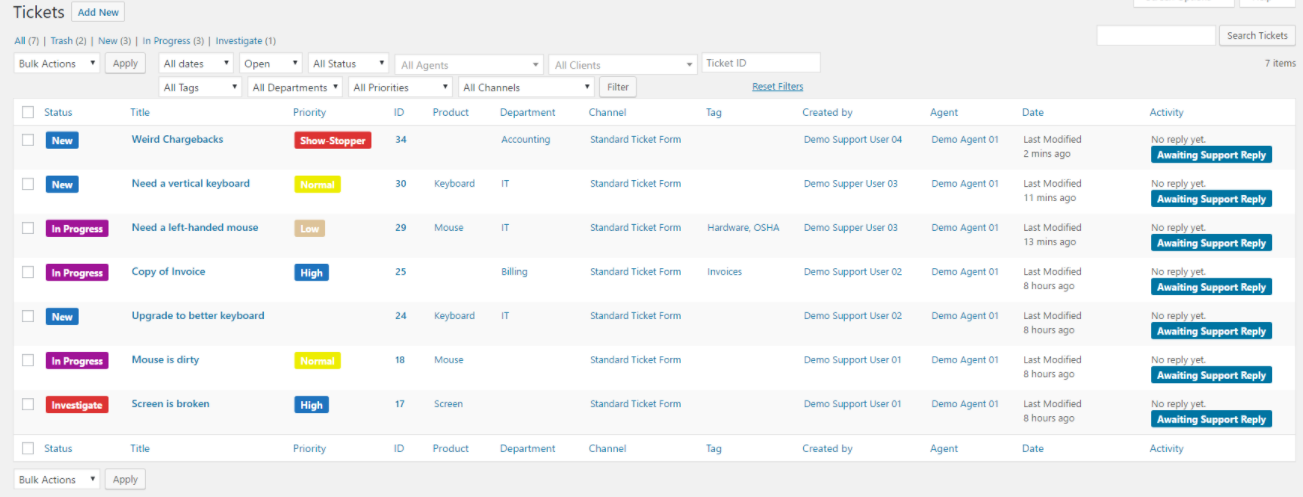
Awesome Support also gives you three different types of color coding for:
- Status
- Priority
- Age of the ticket
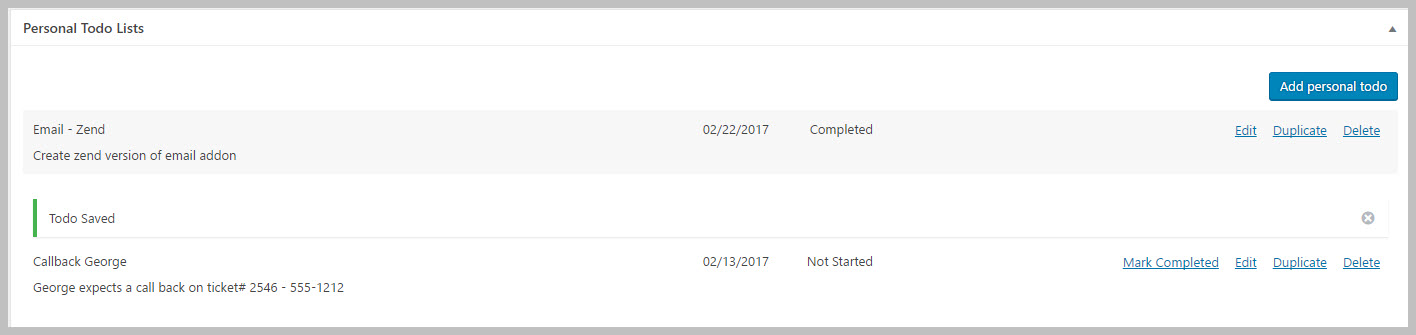
Additionally, Awesome Support ships with some agent-specific organization features that can help boost your team’s productivity. For example, individual agents can create their own to-do lists which can help agents keep themselves organized as they handle a flurry of tickets.
Responding to Tickets From the Interface
While Awesome Support also lets you respond to tickets via email (more on that in a second), we’ll focus on the backend interface for this section.
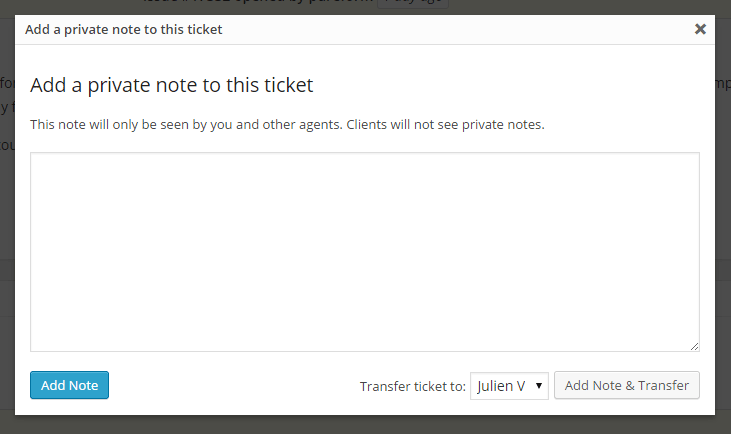
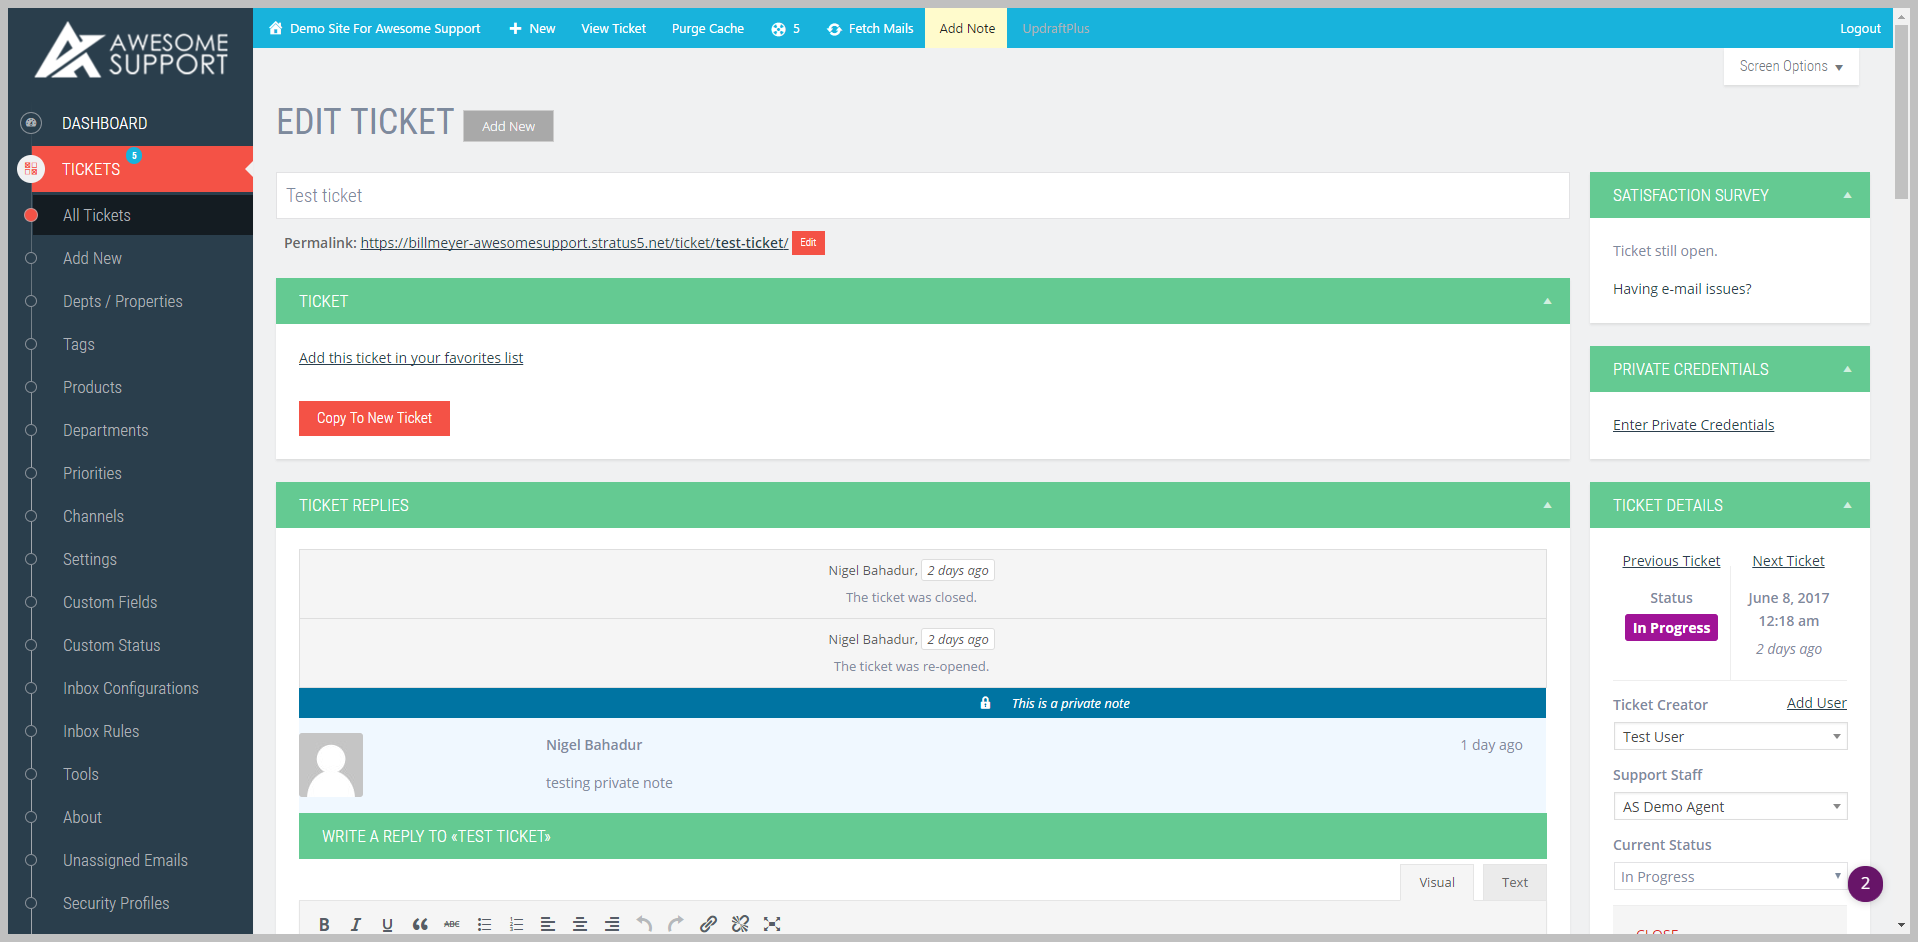
Awesome Support gives you a few different productivity tools when crafting your responses. First off, you can always add private internal notes to tickets. And one of the most helpful features here is that you can leave a note and transfer the ticket to another agent...all in the same action.
This feature is perfect for those times when one of your agents needs help from a different support agent and doesn’t want the response to be public:
Beyond that, you can also use canned pre-made responses to speed up your processes. And again, this function goes deeper most other plugins by allowing you to use template tags when you write your canned responses:
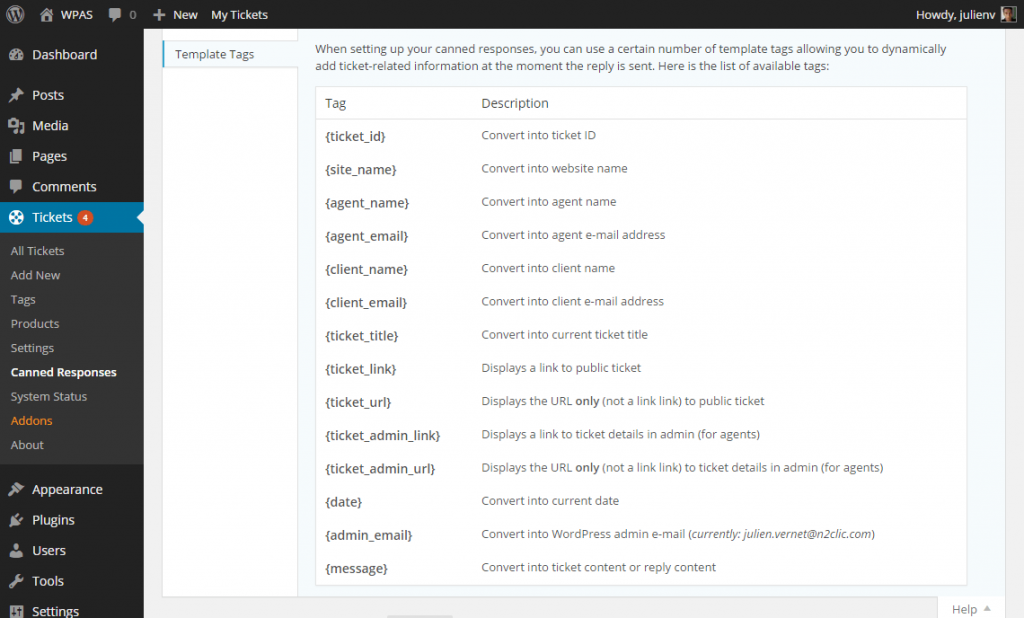
Just because a response is automated doesn’t mean it needs to look like an automated response! With these tags, you can, say, address your customers by their first name, even if you’re using a canned response.
In addition to canned responses, each agent can also have their own personal signature to add an even more unique touch (without adding to the time it takes to respond to a ticket).
And one feature you’re unlikely to see in many other help desk plugins is the ability to merge or split tickets from the ticket response interface. With this feature, you can, say, split a specific ticket response into its own unique ticket, a great solution for complicated problems that require multiple different tasks to be completed.
Similarly, you can also do the converse and merge two tickets together if the issues are duplicated or otherwise related.
Email Piping
Awesome Support lets you:
- Import emails as new tickets
- Respond to tickets via email
- Use rules to accept / reject emails
- Use rules to route/tag/assign emails
If needed, you can pull in emails from multiple mailboxes and automatically add specific priorities, channels, products, and departments depending on which email address a ticket came from.
Most other plugins don’t even let you use multiple inboxes, let alone tag each mailbox with specific information.
Awesome Support goes even deeper, though, by letting you choose:
- What happens when you get an email from an unregistered user
- What happens if someone tries to email a reply to a closed ticket

And you can even filter emails and add rules based on the actual content of the email. You can use this to implement neat productivity savers like:
- Closing a ticket via email
- Transferring a ticket via email
- Avoiding importing emails for out of office replies
Email inbox rules are a powerful feature that can greatly boost the productivity of your support team, all while allowing your team the flexibility to work via email instead of the standard interface.
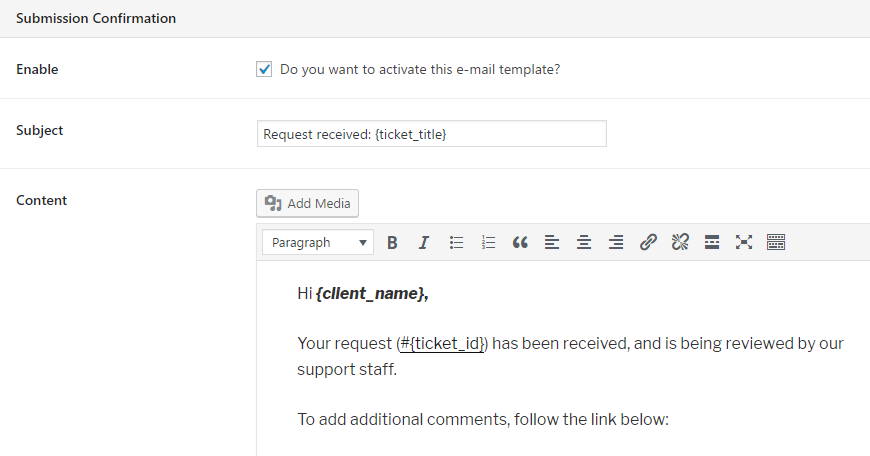
Email Notifications
When it comes to email notifications, Awesome Support sets you up with 5 different base notification emails plus additional possibilities for each custom status that you add. The custom status notifications trigger on changes so that, for example, notifications can be sent to a business owner if a ticket has its status set to “ESCALATED”.
For all the emails, you can edit the template and use dynamic tags to insert real data.
You can also add custom headers and footers that apply to all templates.
Beyond email, you can even notify users and agents via SMS, which is great if your business operates in an especially time-sensitive industry.
Additionally, another unique feature of Awesome Support is the ability to set up alert emails for third parties who aren’t directly part of the ticket. With this feature, you could, say, set up an email alert on a ticket for a small business owner, even if one of their employees is the actual author of the ticket.
Security Functionality for Sensitive Data
Unlike all of the other plugins, Awesome Support does include a private credentials vault that allows your customers to submit sensitive data with additional encryption.
Additionally, any data stored in this field will be automatically deleted when the ticket is closed to ensure that unauthorized users never have a chance to get their hands on it.
If you care about your customers’ security, you need to take extra steps to keep their credentials safe. Awesome Support lets you do that.
But, going along with the deep functionality theme, Awesome Support also includes more than 30 internal security ids (called capabilities in WordPress terminology) mapped to four predefined roles. Each capability can also be assigned to any new or existing roles.

Practically speaking, it means that you can control whether agents see their own tickets or all tickets, which drop-down list (taxonomy) they can edit and even which menu options they can view. You can, for example, allow some agents to add/edit/delete ticket TAGS but prevent them from changing predefined PRIORITY levels. Other agents functioning as supervisors can be allowed to change Canned Responses and FAQs.
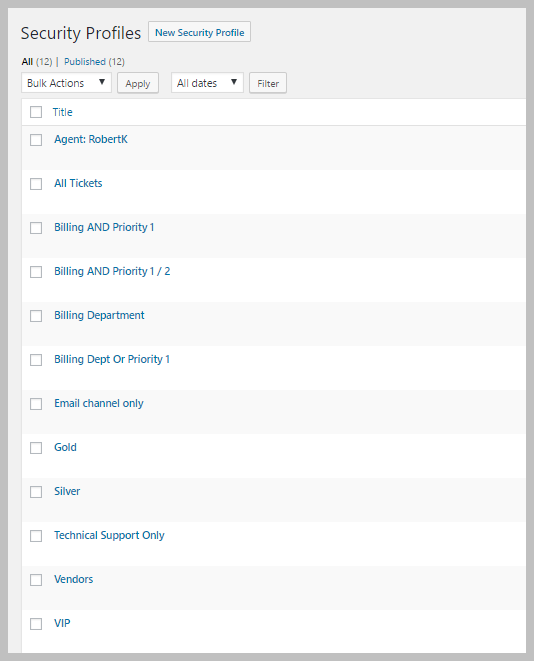
There’s also one more helpful security feature related to the master ticket list. You can configure SECURITY PROFILES and assign them to agents to truly lock down which tickets they can see. Or to expand the tickets that they can see. For example, you can create security profiles for agents to only handle PRIORITY 3 tickets from the SALES DEPARTMENT. Or you can create a security profile for an agent to only handle tickets tagged as VIP regardless of which other agent the ticket was assigned to.
If you routinely accept support requests from "untrusted" sources such as phone calls, chats and non-ticketed emails you also have the the option to use PINS (personal identification numbers). From what we can tell, no other WordPress HelpDesk plugin has this feature. With it, each support user gets assigned a 4 digit number that is only accessible from inside the support account. An agent that receives a phone call can ask for the PIN to verify that the caller does indeed have access to the support account. Its another layer you can to your security layer.
Reporting and Data
Awesome Support gives you access to heaps of reporting data in two ways:
- Simple dashboard stat widgets
- Advanced reports and statistics
We’ll dig into the stats widgets first...
By utilizing individual report widgets, you can create a data dashboard that gives you a high-level overview of everything you need to know, and nothing you don’t.
Get a quick view by:
- Channel
- Status
- Priority
- Department
- And lots more
And if there are any reporting widgets that you don’t need - just remove them and focus on what’s important to you.
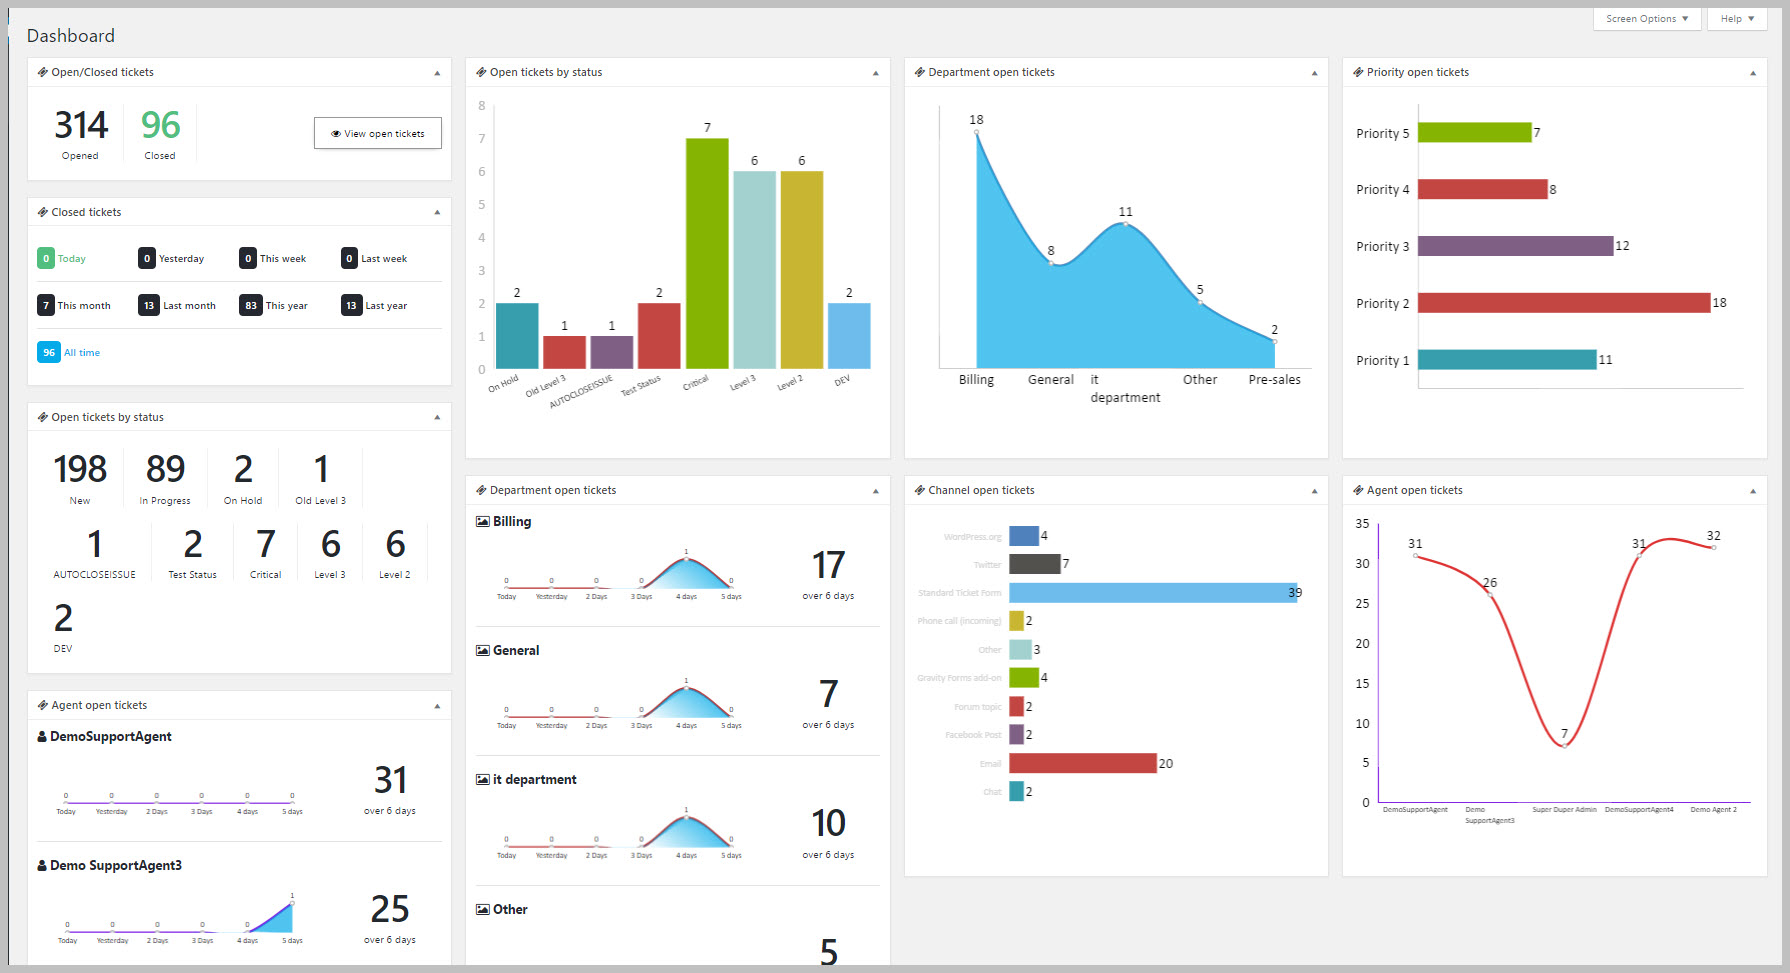
For widgets with charts, you have complete control over the type of chart (choose from up to 9 charts, though maybe, only 5 are really practical for the small display space), colors, line size, x-axis control, and lots more.
By dragging and dropping the widgets around on the WordPress admin dashboard you can create a very powerful help desk decision making console.
But, if you need more information than the basic widgets can offer, you can also dig into the advanced reports and statistics.
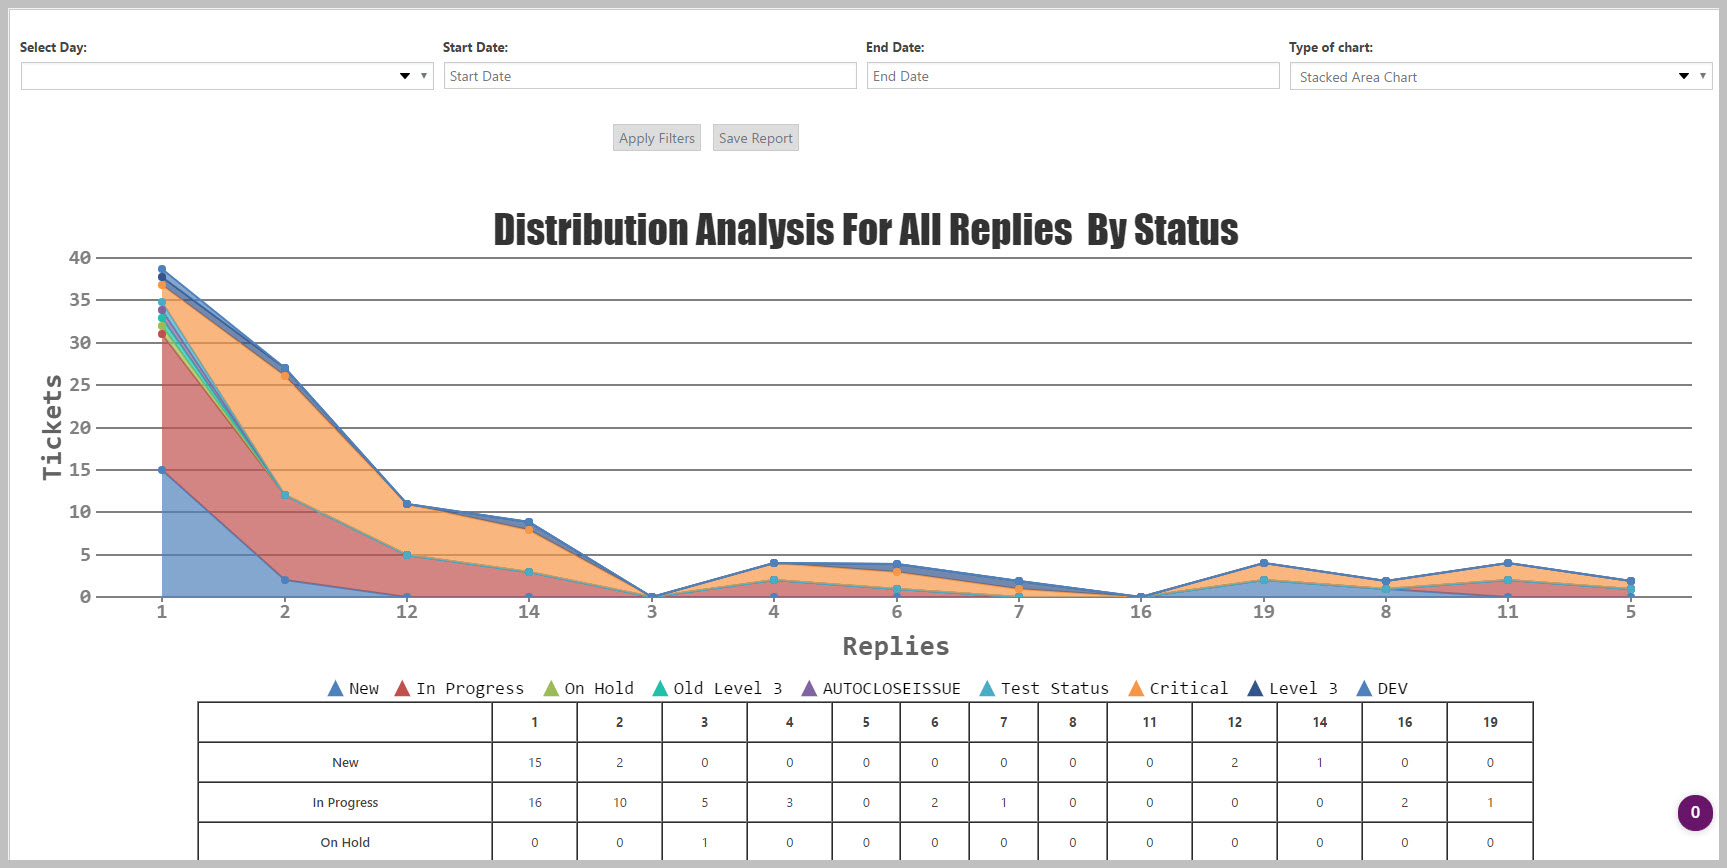
Currently in beta, this advanced reporting area will contain six core reports that you can slice and dice as needed to get the exact data you want:
- Ticket counts - see how many tickets you have by each status.
- Productivity analysis - shows the average, median, and maximum number of replies needed to close a ticket.
- Resolution analysis - shows the average and median time it takes in minutes to resolve a ticket.
- Delay analysis - shows how long, on average, it takes to send the first reply to a ticket, as well as all subsequent replies.
- Distribution analysis - shows the number of tickets that contain 1, 2, 3,...N number of replies.
- Trend analysis - displays the number of tickets opened/closed over a time period.
As far as we know, no other support plugin has such detailed analytics. And the truly important thing is that these analytics can actually help you improve the productivity and success of your support center.
Ecommerce Integration
Running an eCommerce store on WordPress? Awesome Support doesn’t integrate with just one WordPress e-commerce plugin but three:
- WooCommerce (of course)
- Easy Digital Downloads
- Envato
For WooCommerce, the user can log into their WC account and click a HELP button right next to their order to open a ticket.

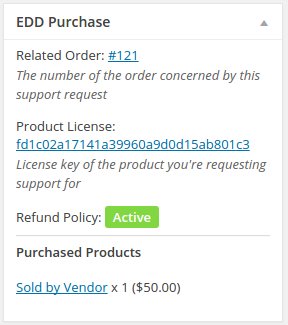
With Easy Digital Downloads, integration with their licensing module allows you to optionally restrict tickets to only licensed users.
And with Envato, you can force a user to enter an Envato license number that is validated before a ticket can be opened.

Each module has additional functions specific to its corresponding vendor. For example, EDD has a field that shows the lifetime value of a customer – this is shown on a ticket so that an agent can see how much the customer has contributed to the business which helps them to keep their biggest customers happier.
Cool Management Tools
Awesome Support also gives you some other unique management tools to improve your help desk’s productivity.
We’ve already mentioned Splitting and Merging tickets above, but you also get some other helpful tools.
For example, you can set up both limits for active and overall tickets. This means that you could set up a restriction to only allow a user to have a maximum of, say, three tickets open at one time. Or, you could allow a max of 25 tickets total per user to prevent users from abusing free support.
There is also something called Ticket lock that prevents users from re-opening a closed ticket. The ticket can be locked manually by an agent or automatically when its closed. If you’ve ever been frustrated by users who reopen really old tickets this feature can really nip that behaviour in the bud.
Automatic Ticket Close works in the background to send customers warnings about open tickets. When conditions you specify are met, tickets that haven’t had a customer response are then automatically closed. This allows you to focus most of your attention on tickets that are truly active. One cool thing you can do with this is to use it as simply a customer reminder mechanism – you aren’t actually forced to create a ticket-closing rule.
Satisfaction Surveys
Used incorrectly, satisfaction surveys can quickly annoy customers. But used properly, they can provide feedback and alert you early on to potential issues with your help center.
Awesome Support offers four types of surveys including the popular “quick-link” surveys at the bottom of every email the customer receives about a ticket. These are usually the most effective and will likely result in your customer proactively closing tickets and assigning a rating since they can do both with just one click. The results of a survey for a particular ticket are shown directly on the ticket.

Guest Tickets
Sometimes you just want to reduce the friction involved with entering a ticket. A new user should be able to enter a ticket without first registering on the site. Awesome Support admins have the option to allow a new user to create a ticket without first creating an account.
“Guests” can then interact with the ticket via email and, with the addition of certain links to the email alerts, they can even close and rate tickets without having to log into the help desk system.
Productivity Tools
More productive agents means a better bottom line – there’s no question about that. Some of the productivity tools included in Awesome Support are:
- The flexible ticket list
- To-do lists
- Agent signatures
- Customer notes
- Agent personal notes
Other Unique Features
Awesome Support has an array of addons that offer unique functionality. Here are some of the highlights of unique things you can do:
Get team notifications via a slack channel + more:
With the Notifications extension, you can set up alerts for Slack and Pushbullet. That way, your whole team can get a Slack notification when a new ticket rolls in.
Create Public Tickets or FAQs:
One way Awesome Support can save you time and lessen your support load is through its FAQs and Public Tickets features. With FAQs, you can quickly take any reply and make it into a FAQ entry with just a few clicks.
Public Tickets, on the other hand, make the entire ticket public, which is the absolute quickest way to make information available to all of your customers. Of course, if you take advantage of this optional feature, you should always make sure your customers are aware that their ticket responses will be publicly available.
One Click Close
Customers don’t always want to take the extra step to log into your site to close tickets. So Awesome Support includes an optional tag that can be added to every email giving the customer a single-click option to close the ticket.
File Uploads
The plugin has an optional drag-and-drop interface for uploading files. When the interface is used, the files are stored in the cloud using a service called FilePickr – effectively off-loading them from your web server. But it also allows you to configure things so that the user can upload files directly from Dropbox, Facebook, Evernote etc. And, of course, you can limit the type of files allowed.
Built-in Time Tracking for Easy Invoicing
While a few other help desk plugins offer basic time tracking, Awesome Support is the only plugin to offer deep time tracking with features that let you:
- Automatically record the time spent for each reply to a ticket.
- Specify a minimum amount for each time entry.
- Set billing rates at the agent, client, and ticket levels for easy invoicing.
- Configure which specific agents count towards billable time.
- And lots more.
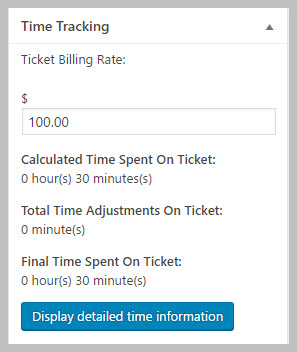
If you need to bill clients for the specific time you spend on support, we don’t think you’ll find a help desk plugin with anywhere near the time tracking depth offered by Awesome Support.
General Thoughts on User Interface
Awesome Support relies on core WordPress styling as much as possible. This does two things:
- Ensures you’re operating in a familiar interface (the WordPress dashboard).
- Allows you to add custom styling via admin themes without negatively affecting the plugin.
If you’re not a fan of the core WordPress aesthetic, Awesome Support has guides that can help you re-style the admin to create a white-label looking help desk.
Here’s an example of a completely re-styled Admin for Awesome Support:
Pricing and Final Thoughts
You can download the core plugin for free from WordPress.org. While the free version is a functional and solid helpdesk, if you’d like access to many of the features we discussed in the preceding sections, you’ll need to purchase some of the pro addons.
You have two different ways to expand the functionality of the free version of Awesome Support.
First off, you can purchase individual addons on an “a la carte” basis. If you just need a couple of addons, this might be your best course of action.
But Awesome Support also sells bundles that allow you to save 30% - 65% versus buying the individual addons. These bundles are tailored towards specific business sizes and come in four sizes:
- Standard - $149
- PRO - $229
- Enterprise - $289
- Agency - $409
About The Author: Colin Newcomber
Colin Newcomer has been working with WordPress for over 11 years. Since September 2016, he's been working full-time as a freelance writer focusing primarily on WordPress and digital marketing. He helps clients grow their web visibility by writing engaging, well-researched blog posts. You can contact Colin through his website at: https://www.cnewcomer.com/
THREE EASY WAYS TO GET STARTED WITH AWESOME SUPPORT TODAY!
Purchase A Bundle
Download Free Plugin
Install From WordPress.org