Using Awesome Support With WC Vendors (And Other Multi-Vendor Marketplaces)
If you're running a multi-vendor store you know that everything related to e-commerce gets more complicated. This includes your help-desk operations. Turning your Vendors into agents of your help desk can be a tricky process - if only because a lot of things your internal agents can view in your help desk should be off limits to vendors.
So, this guide was written to help you set up Awesome Support as your Support Desk when you are running a store with multiple vendors. Since Awesome Support has an amazing array of options to support just about any help-desk operation, there are a lot of configuration options you can tweak to make sure that your vendors can only access the essential functions that they need.
We are going to use the WC VENDORs plugin as the baseline for our tutorial but the concepts can be applied to other multi-vendor plugins such as DOKAN and EDD Front-end Submissions as well.
Additionally, in the interest of space, this will not be an exhaustive article. We've tried to show a lot of detail but there are some areas where we've summarized the steps you need to perform.
Before getting started we strongly suggest that you scan through this entire article before getting down to actually doing the work. This way you get some idea of what needs to be done and can reserve the time and resources you might need to complete the configuration.
Work Flow Scenario With WC Vendors
We are going to assume the following are the requirements for your help desk:
- All vendors should receive tickets related to their products and only their products
- Vendors will respond to tickets primarily by email but should still be able to log in to see their open and closed tickets and/or to respond to tickets
- When logged into your site vendors should only see tickets that belong to their store and should not see tickets from other vendors
- Administrators can see tickets from all vendors
- Administrators will get alerts for tickets that are not closed after 10 days
- Tickets that are awaiting user responses will be closed after 7 days of inactivity
We are also going to assume that you have a basic Awesome Support environment up and running already so we do not have to cover the standard installation of it as well.
Prerequisites
In order to accomplish all the functions above, you will need the following plugins and add-ons:
- Awesome Support Core from WordPress.org (Version 4.4.0 or later)
- WC Vendors Free from WordPress.org or WC Vendors Pro
- Agent Front End add-on for Awesome Support
- Admin Menu Editor Pro (Used for locking down the menu items that vendors are not allowed to see when handling tickets)
- The Email Support add-on for Awesome Support (allows your agents and users to reply to tickets by email instead of logging into your support desk)
- The Automatic Ticket Close add-on for Awesome Support
- The Business Rules Engine add-on for Awesome Support
- The Smart Agent Assignment add-on for Awesome Support (Used to route tickets based on the Product the user chose on the ticket form)
- The POWERPACK add-on for Awesome Support (Used to make the PRODUCT field mandatory on tickets and to lock down some options that are not appropriate for your vendors to view)
- User Role Editor from WordPress.org
Once you have all of these installed, you are ready to configure your help desk to route tickets to your vendors.
Set Up Your Vendors As Agents
The first thing you will need to do is set up your vendors as support agents. In order to do this you will need to add the Awesome Support security settings to the VENDORS role that WC VENDORS uses to identify vendors. (Note: We are assuming that you have not decided to use a custom role for your vendors - if you have done so then the modification needs to be done to that custom role instead. For the rest of this article we will continue to assume that the role name is VENDORS.)
The easiest way to apply these security settings to your VENDOR role is to use the free User Role Editor plugin from WordPress.org. Once installed perform the following steps:
- Go to USERS->User Role Editor
- Locate the VENDOR role from the drop-down at the top of the screen
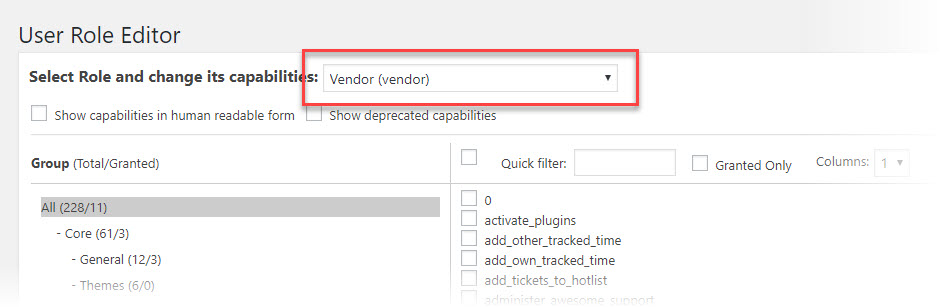
- On the right side of the screen will be a list of WordPress CAPABILITIES. You need to locate and enable the checkboxes next to the following items:
- view_ticket
- view_private_ticket
- edit_ticket
- edit_other_ticket
- close_ticket
- reply_ticket
- create_ticket
- attach_files

- Click the UPDATE button on the right on side of the screen and your vendors will be configured as Awesome Support agents.
TIP: If you are Using EDD's FRONT END SUBMISSIONS plugin then the role you will need to modify is SHOP VENDOR.
Make Sure Vendors And Other Agents Can Only View Their Own Tickets
Under most default installations, agents can see all tickets. So, we need to now make sure that they can only see their own tickets - this prevents them from seeing other vendors tickets.
To do this:
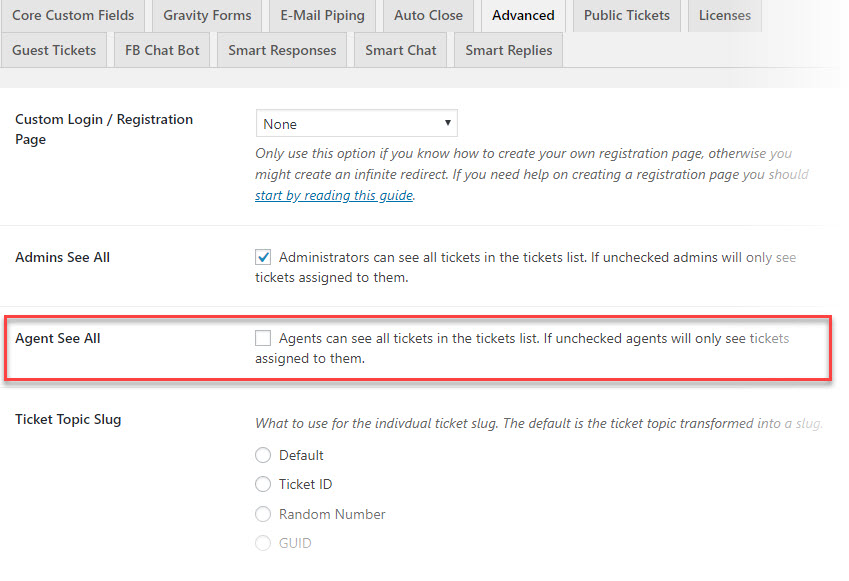
- Go To the TICKETS->SETTINGS->ADVANCED tab
- Make sure that the AGENTS SEE ALL checkbox is NOT enabled
Make Sure Tickets Can Be Assigned To Vendors
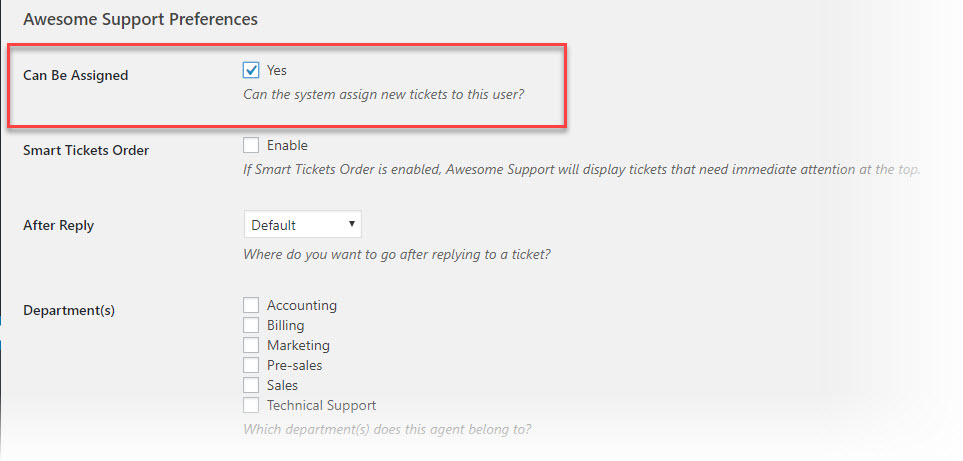
At this point, your vendors are agents but they cannot be assigned tickets. In order to make sure that they can receive tickets, go to each of their WordPress user profiles and enable the CAN BE ASSIGNED checkbox.
At this point you can verify that you have done the prior steps correctly by logging into your help desk back-end using a vendor log in. You should be able to view existing tickets (or at least see the ticket screens). You'll also see a lot of other sensitive menu options as well but don't worry - we'll handle those later in this article.
Set The Assignment Algorithm
At this point we need to make sure that the agent assignment algorithm takes into account the PRODUCT that the user selects on the ticket form when they submit a ticket. To do this:
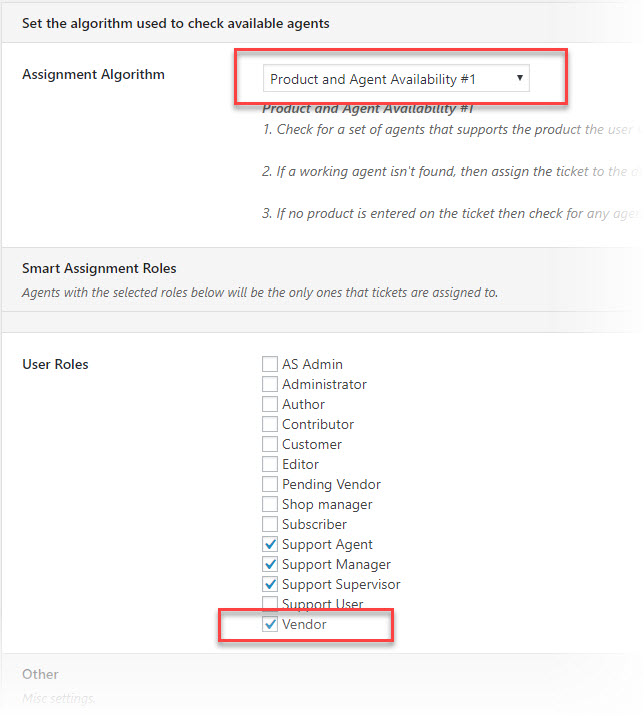
- Go to the TICKETS->SETTINGS->SMART ASSIGNMENT tab
- Select the PRODUCT AND AGENT AVAILABILITY #1 option from the drop-down (if you are using Awesome Support 4.4.0 or later you can choose PRODUCT AND AGENT AVAILABILITY #3 instead)
- Under the USER ROLES section, make sure that VENDOR is the only role that can be assigned tickets (unless you have your own internal support agents in which case make sure the SUPPORT AGENT role is selected as well).
Assign Support Products To Vendors
This part of the process is likely to be the most time consuming - as well as the one where you'll need to make sure you update your on-boarding processes to address. This is where you let Awesome Support know which agent-vendors handle which products. Awesome Support does NOT automatically read the vendor field from your product profile so this step has to be done for every Vendor and every new product that is added to the store.
To assign products to your vendors for support:
- Access your vendor's user profile by going to the WordPress USERS menu and edit the vendor profile
- Once inside the vendor profile, scroll down to the AWESOME SUPPORT: SET PRODUCT AND AVAILABILITY OF AGENT section
- Use the checkboxes to enable the vendor to handle the individual products that they own

- Additionally, you must make sure that the HOURS worked by your vendor is 24 x 7. So, under the DAYS AVAILABLE section, make sure you enable all days and all hours.

Test Your Configuration
At this point you can go to your SUBMIT TICKET page and submit a ticket for a vendor product that you've assigned above. If all is configured properly, tickets will be sent to each individual vendor instead of your internal agent.
If tickets are being assigned to the wrong vendor, then you should go through the above steps once again and double-check that things are set up as described.
DO NOT PROCEED FURTHER TILL YOUR TEST TICKETS ARE BEING ROUTED TO THE CORRECT VENDOR. There really is no point to it - everything else below is about fine-tuning and securing your system.
Now, lets fine-tune some things
Make Products Mandatory
Since the routing of tickets depend on a ticket actually having a PRODUCT on it, you must make sure that the product field is mandatory.
- Go to TICKETS->SETTINGS->PF OPTIONS
- Scroll down to the PRODUCT FIELD OPTIONS section
- Enable the MAKE PRODUCT MANDATORY checkbox
- Scroll down and click the SAVE CHANGES button.
Now, tickets cannot be submitted without a product.
Select Your Default Agent
Tickets that cannot be assigned for some reason needs to be assigned to a default agent.
- Go to the TICKETS->SETTINGS-GENERAL tab
- In the drop-down for the DEFAULT ASSIGNEE field, select your default agent (probably you!)
Enable Product Syncing
If you have a lot of products it might be easier to sync the Awesome Support product list with your WooCommerce (or EDD) product list.
- Go to TICKETS->SETTINGS->PRODUCTS MANAGEMENT
- Make sure the MULTIPLE PRODUCTS checkbox is enabled
- Make sure the SYNCHRONIZE WOOCOMERCE PRODUCTS checkbox is enabled.
If you already have products in your WC store then you will also need to go to do the following:
- Go to TICKETS->TOOLS->CLEANUP tab
- click on the RE-SYNCHRONIZE PRODUCTS button.
Close Abandoned Tickets After 7 Days
If a vendor or agent has replied to a ticket but the user does not respond it is best to just close the ticket automatically. To do this we will set up two emails, one of which will automatically close the ticket.
First email:
- Go to the TICKETS->SETTINGS->AUTO CLOSE tab
- Click the ADD WARNING button
- Set the STATUS to IN PROCESS
- Set the age to 7200 (5 days)
- Set the subject to something like: WARNING - Your Open Ticket Will Be Closed Soon
- Set the Warning Message to something like: "We just wanted to let you know that your ticket will be closed soon because we have not heard from you..."
- Note: You can use the normal Awesome Support Template tags to personalize the email and insert things like the ticket number and ticket subject
- Do NOT check the CLOSE box since this first email is only a warning message
- Note: By sending a warning message first you give the user time to respond to the ticket instead of annoying them by closing the ticket without warning
Second Email - this one will close the ticket:
- Click the ADD WARNING button again
- Set the STATUS to IN PROCESS
- Set the age to 10080 (7 days)
- Set the subject to something like: "Your Ticket Was Closed Because We Did Not Hear From You"
- Set the Warning Message to something appropriate for the closing of a ticket.
- Enable the CLOSE check-box to make sure that the ticket is closed
Now, abandoned tickets are sent a warning message after 5 days and then automatically closed after 7 days.
If a ticket is waiting for a reply from an agent it will NOT be automatically closed. These warnings only apply to tickets that are waiting for a response from the CUSTOMER.
Let the Administrator Know If Tickets Have Been Opened For More Than 10 Days
In order to preserve your store's reputation you really want to make sure that tickets are being handled. If one has been open for too long, you might need to step in and help. So lets make sure that you get a warning email if a ticket is still open after 10 days. To do this we will set up a BUSINESS RULE. But first, we need to set up the warning email template.
- Go to AS RULESET->EMAIL TEMPLATE
- At the top of the page click the ADD NEW TEMPLATE button
- Enter the EMAIL SUBJECT - something like "Warning: OLD TICKET - {ticket_id} / {ticket_title}"
- Enter the body of the email - you can use the normal Awesome Support email template tags
- Click the PUBLISH button on the right of the page.
Now set up the business rule that will use the email template
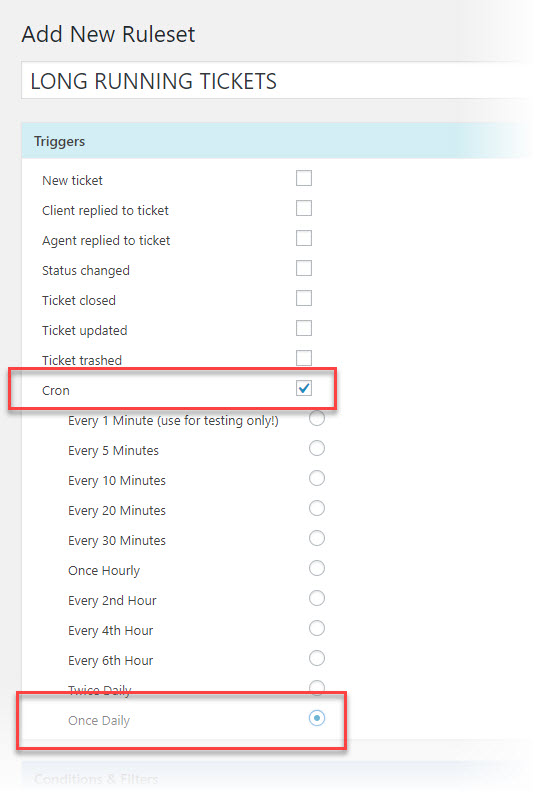
- Go to AS RULESET->ADD NEW RULESET
- At the very top of the page, give the rule a name in the field labeled ENTER TITLE HERE. You can give it a name like "LONG RUNNING TICKETS"
- In the TRIGGERS section at the top of the page, enable the CRON option and choose the ONCE DAILY radio button.
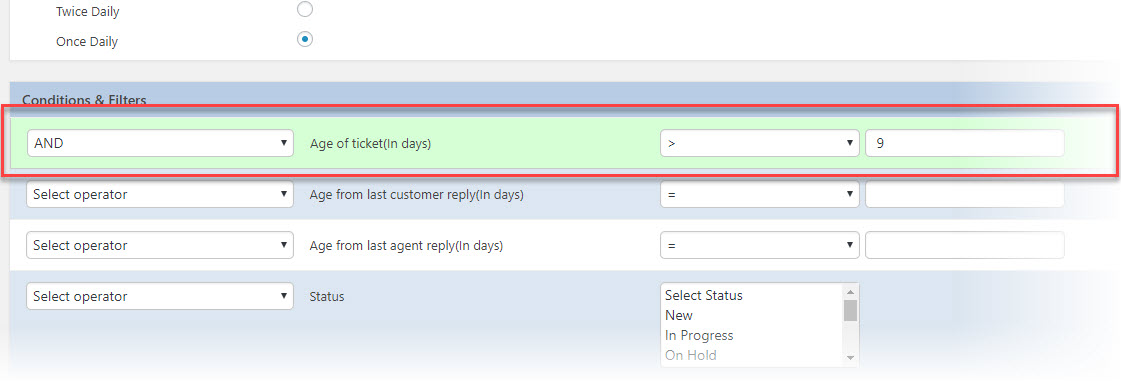
- In the CONDITIONS AND FILTER section set the AGE OF TICKETS to > 9 days. Make sure you select the AND condition at the start of the row.
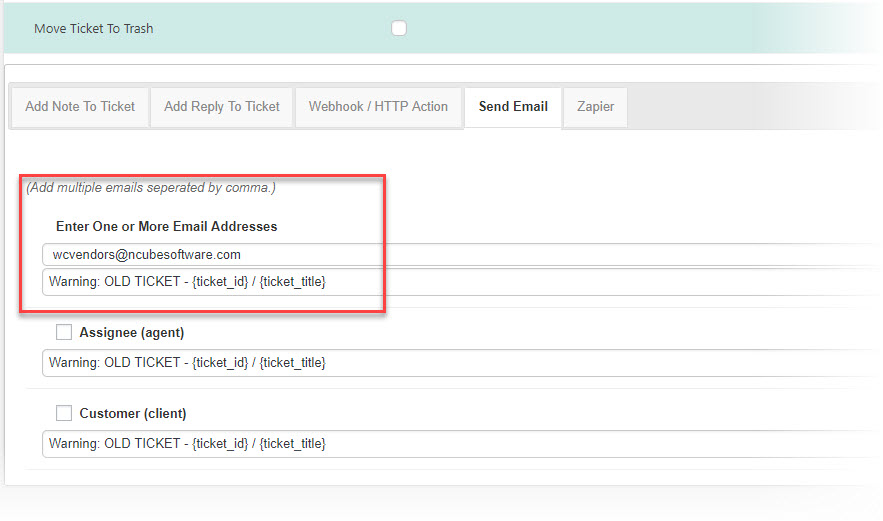
- Below the ACTIONS section, click on the SEND EMAIL tab.
- Enter your email address
- Below your email address is a drop-down select list - choose the email template you created at the start of this section.
- You might also want to enable the ASSIGNEE checkbox as well (which will be the vendor) so that they receive the same warning (or you can create a new email template just for them).
Tip: You can also enable a PRIVATE NOTE action to add a note to the ticket so that anyone reading the ticket will know that an email was sent.
Enable Agents And Clients To Respond To Tickets By Email
You can enable agents and clients to respond to tickets by emails. First, make sure that you have a RELIABLE outgoing email system. It is HIGHLY RECOMMENDED that you use an email transaction service such as MAILGUN and SENDGRID.
Once you are confident that your outgoing emails are working you should do the following:
- Go to TICKETS->SETTINGS->EMAILS and configure the contents of your email alerts. In particular, make sure that the {message} tag or {fullticket} tags are in the emails being sent to AGENTS and CUSTOMERS. Otherwise they will need to log into the ticket system to read tickets and replies.
- Set up the EMAIL SUPPORT add-on so that replies from agents and customers are added to the ticket and routed to each other. Directions for setting this up are located here.
NOTE: AGENTS (VENDORS) MUST respond to tickets using the email address in their user profile. Otherwise the reply will be not be registered as an agent reply!
Configure A Rule To Close Tickets By Email
You might want to allow your vendors to close their tickets by email. The best way to do this is to create another Business Rule.
- Go to TICKETS->AS RULESET->ADD NEW RULESET
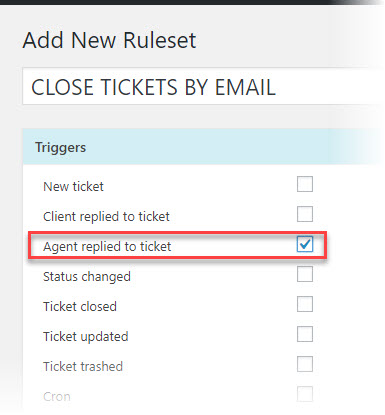
- At the very top of the page, give the rule a name in the field labeled ENTER TITLE HERE. You can give it a name like "CLOSE TICKETS"
- In the TRIGGERS section at the top of the page, enable the AGENT REPLIED TO EMAIL checkbox
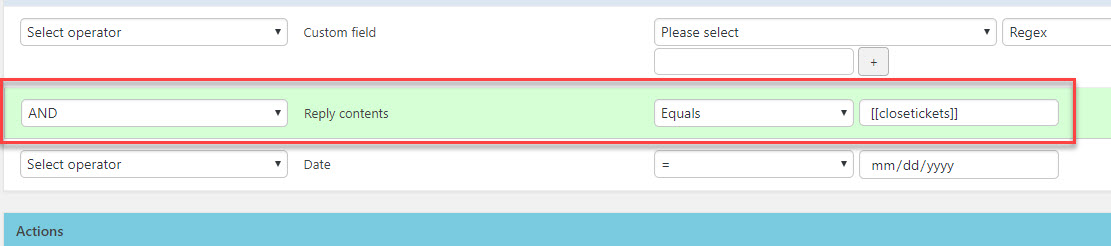
- In the CONDITIONS & FILTERS section set the REPLY CONTENTS row so that it looks like this:
- In the ACTIONS section, enable the CLOSE TICKET checkbox
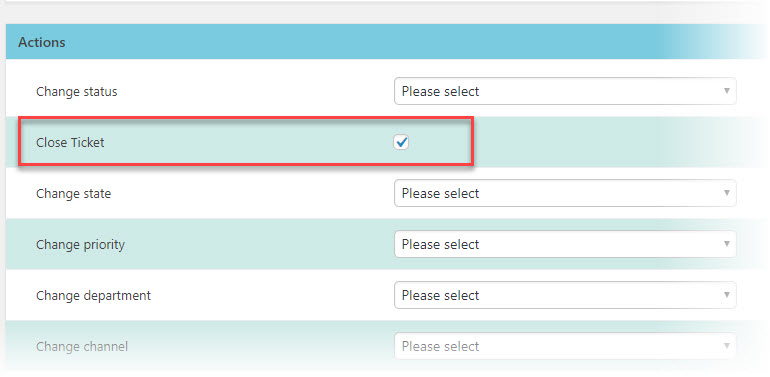
- Click the SAVE (or PUBLISH) button in the upper right side of the screen.
Now, if an email reply is received to an open ticket AND the email reply contains [[closetickets]] then the ticket will be closed.
Note: You can also create a similar rule in TICKETS->INBOX RULES. Either rule would work but you probably should only do it in one location.
Allow Vendors To Log In To Your Help Desk
Install and activate the Agent Front-end add-on for Awesome Support
- Go to TICKETS->SETTINGS->AGENT FRONT END
- Turn on the first check-box
- Copy the shortcode to your clipboard
- Add a new WordPress page
- Paste the shortcode into the page
- Save the page
- Add the page to one of your site's menus
Now, your vendors will be able to use the front-end of your site to log in to view and respond to tickets.
Security Tweaks
Using the ADMIN MENU PRO plugin features, remove the TICKET menu options for the VENDOR or SHOP_VENDOR role(s). This prevents vendors from accessing the ticket menu even if they log into the back-end.
Almost There
A this point you have everything you need to get going with Awesome Support in your multi-vendor marketplace. But, you might want to consider the optional ideas listed below:
Optional: Enable Satisfaction Surveys
Since your tickets are being handled by a variety of third parties you should seriously consider getting feedback from your customers after a ticket has been closed. The last thing you want is for your business to get a bad reputation if your customer issues are not being handled properly.
Optional: Create a Gravity Form for complaints
There might be use cases where you want tickets to go DIRECTLY to you. However, since you might not have a product and products are mandatory there are a couple of ways to handle this:
- Create a special product called _Complaint that the user can select - this product will have you listed as the vendor in the product profile screen
- Create a completely different ticket form using GRAVITY FORMS and our GRAVITY FORMS BRIDGE
Optional: Set up Service Level Agreements
You can assign due dates to tickets automatically by using service level agreements. And you can use the alerting feature to send warning emails to your vendors as the due-date gets closer. This is just another way to keep your vendors on top of the tickets they are responsible for while ensuring a high level of service for your customers.
Wrap Up
Many of the above steps need to be done only once. However, there are a few that you will have to perform every time you add a new vendor or every time a new product is approved for your marketplace. So, you will need to add these actions as part of your on-boarding checklist:
When new products are approved:
- Assign any new products to a vendor in their vendor user profile
When new vendors are approved:
- Make sure that new vendors have their Can be assigned flag ticked in their vendor user profile
- Make sure that the new vendor working hours are set to 24x7 in their vendor user profile
Its not a lot - the changes just needs to become a natural part of your day-to-day process.
Optional Configuration Items
Security: Lock Down The Back-end For Vendors
If your vendor needs access to advanced ticketing functions and need to log into wp-admin then you can use the following ideas to lock-down sensitive items that you might not want them to see.
Many plugins, by default, will show their menu options to almost all users logged into the back-end. Therefore you need to remove these for any user that has the VENDOR role. You can do this with the Admin Menu Editor Pro plugin. Please see the documentation on their site for how to do this.
This plugin can also help you to remove additional Awesome Support menu options that are usually available to agents but that you might not want vendors to see - such as:
- Business Rules Email Templates
- Service Level Agreement Taxnomies
- Issue Tracking
- Remote Tickets
Alternatively, you can disable back-end access for VENDORS by removing the TICKETS (and related menu options) using this same plugin. If you do this then vendors will handle tickets completely by email or the Agent Front-end extension.
Note: We do believe that restricting your vendors to handling the entire ticket/support process by email is the most secure way to handle your tickets. But, if you would like your vendors to log into the back-end of your site to access more advanced agent functions then you should read the rest of this section. It will help you to understand what additional steps you might need to take to lock down sensitive functional areas.
Make Sure Vendors Cannot Change Agents On A Ticket
If using version 4.4.0 or later of Awesome Support, you will need to change the drop-down type used to display agents on the ticket.
- Go to the TICKETS->SETTINGS->GENERAL tab
- Enable the USE SELECT2 FOR STAFF DROP-DOWNS option.
- Scroll down to the bottom of the screen and click the SAVE CHANGES button.
Make Sure Vendors Cannot See Other Tickets In The User Profile Widget
Under normal circumstances, agents can see the list of other tickets that a user has opened directly inside the ticket. However, we need to hide this list from other vendors since they are not really agents and should not see these other tickets.
- Go to the TICKETS->SETTINGS->PF OPTIONS tab
- Scroll down to the TICKET LIMITS section
- Enter "vendor" in the ROLES THAT DO NOT SEE TICKETS IN USER PROFILE WIDGET field (or, if using EDD's FRONT END SUBMISSIONS enter "shop_vendor").
- Scroll down to the bottom of the screen and click the SAVE CHANGES button.

Remove The ADD USER Link From The Ticket Details Metabox
Agents have the option to add a user on the fly when adding a ticket in wp-admin. But, in a multi-vendor marketplace where agents are vendors, it is usually not appropriate to allow them to add users to your installation. So we need to lock down this option.
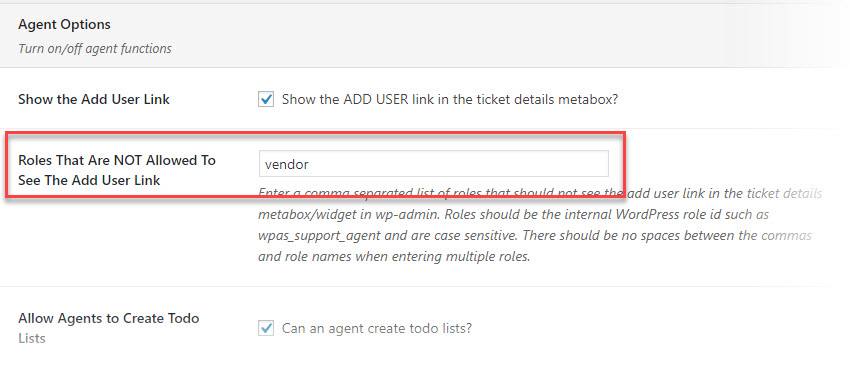
- Go to the TICKETS->SETTINGS->PRODUCTIVITY tab
- Enter "vendor" in the ROLES THAT ARE NOT ALLOWED TO SEE THE ADD USER LINK field (or, if using EDD's FRONT END SUBMISSIONS enter "shop_vendor").
- Alternatively you can just turn off the add user link completely by un-checking the SHOW THE ADD USER LINK option.
- Scroll down to the bottom of the screen and click the SAVE CHANGES button.
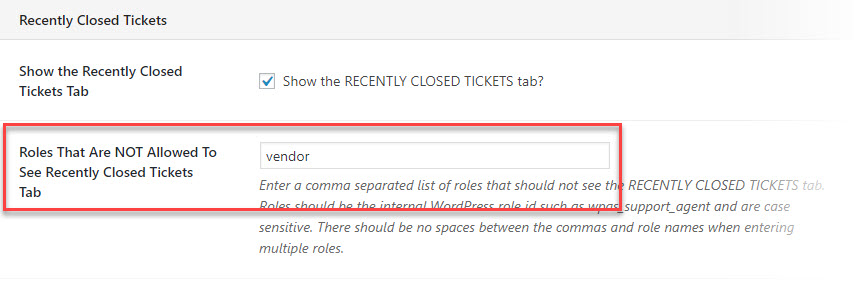
Remove Access To The RECENTLY CLOSED Ticket Tab
Agents can view a list of recently closed tickets in a separate tab on the ticket screen. But, again, for Vendors, this might not be appropriate so lets remove it.
- Go to the TICKETS->SETTINGS->PRODUCTIVITY tab
- Enter "vendor" in the ROLES THAT ARE NOT ALLOWED TO SEE THE RECENTLY CLOSED TICKETS TAB field (or, if using EDD's FRONT END SUBMISSIONS enter "shop_vendor").
- Alternatively you can just turn off access to the Recently Closed Tickets tab completely by un-checking the SHOW THE RECENTLY CLOSED TICKETS TAB option.
- Scroll down to the bottom of the screen and click the SAVE CHANGES button.
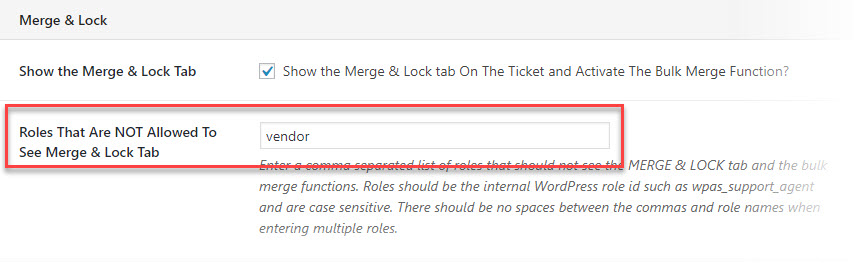
Remove Access To Ticket Merging
Agents can generally merge and lock tickets but this might not be appropriate when vendors are acting as agents so lets remove it.
- Go to the TICKETS->SETTINGS->PRODUCTIVITY tab
- Enter "vendor" in the ROLES THAT ARE NOT ALLOWED TO SEE THE MERGE &LOCK TAB field (or, if using EDD's FRONT END SUBMISSIONS enter "shop_vendor").
- Alternatively you can just remove access to Ticket Merging completely by un-checking the SHOW THE MERGE & LOCK TAB option.
- Scroll down to the bottom of the screen and click the SAVE CHANGES button.
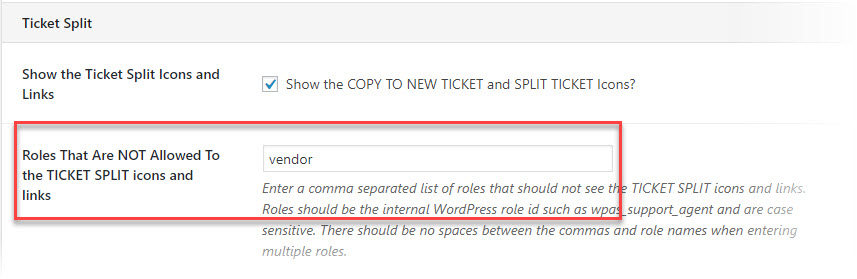
Remove Access To Ticket Splitting
Agents can generally split tickets but this is going to cause the new split ticket to be assigned to the default agent since it will NOT have a product on it. Therefore we need to remove that function for vendors
- Go to the TICKETS->SETTINGS->PRODUCTIVITY tab
- Enter "vendor" in the ROLES THAT ARE NOT ALLOWED TO SEE THE TICKET SPLIT ICONS AND LINKS field (or, if using EDD's FRONT END SUBMISSIONS enter "shop_vendor").
- Alternatively you can just turn off the ticket split function completely by un-checking the SHOW THE TICKET SPLIT ICONS AND LINKS option.
- Scroll down to the bottom of the screen and click the SAVE CHANGES button.
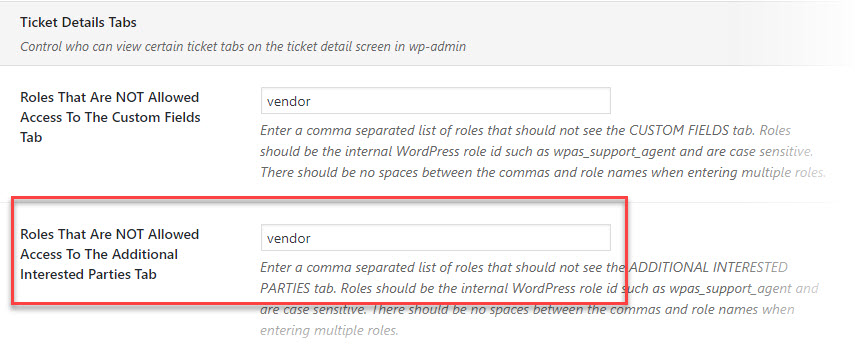
Remove Access To Additional Interested Parties Fields
If you have turned on additional agents or 3rd party fields then you might not want to allow vendors to access and change those fields. To remove them from the vendor's view:
- Go to the TICKETS->SETTINGS->GENERAL tab
- Scroll down to the TICKET DETAILS TABS section
- Enter "vendor" in the ROLES THAT ARE NOT ALLOWED ACCESS TO THE ADDITIONAL INTERESTED PARTIES field (or, if using EDD's FRONT END SUBMISSIONS enter "shop_vendor").
- Scroll down to the bottom of the screen and click the SAVE CHANGES button.
Optional: Remove Access To Quick Link Tabs For Documentation, FAQs and Others
If you have installed the DOCUMENTATION, FAQ, CANNED RESPONSE or CUSTOM FAQ add-ons then your agents have access to tabs containing certain quick-reply type functions as well as certain house-keeping functions. This might not be appropriate for Vendors. You can go to their respective settings screen and set the VENDOR role to remove access (similar to many of the actions we've illustrated above).
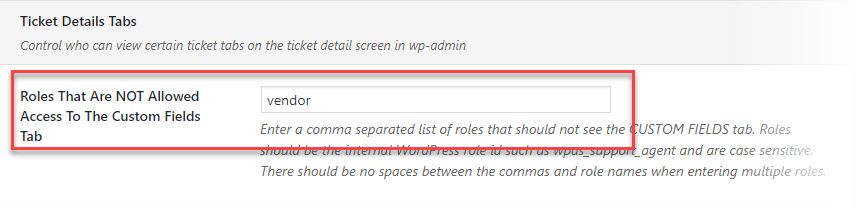
Optional: Remove Access To Custom Fields In Admin
In some operations, custom fields can hold sensitive information. If this is the case, you might not want your vendors to have access to them - especially the ones that are back-end only. To remove access:
- Go to the TICKETS->SETTINGS->GENERAL tab
- Scroll down to the TICKET DETAILS TABS section
- Enter "vendor" in the ROLES THAT ARE NOT ALLOWED ACCESS TO THE CUSTOM FIELDS field (or, if using EDD's FRONT END SUBMISSIONS enter "shop_vendor").
- Scroll down to the bottom of the screen and click the SAVE CHANGES button.
Optional: Remove Other Plugin Metaboxes
Other plugins might add metaboxes to the ticket detail screen. Examples include Yoast, some debuggers, generic WordPress custom fields plugins, metabox management plugins and even your theme. These items might or might not be appropriate for vendors to view. You should examine them from the perspective of your vendors with an eye to locking them down if not appropriate.
This document has received the following updates:
- May 17th 2018: Updated to reflect the availability of the Agent Front-end add-on.
THREE EASY WAYS TO GET STARTED WITH AWESOME SUPPORT TODAY!
Purchase A Bundle
Download Free Plugin
Install From WordPress.org