Get An Alert When A Ticket Is Submitted From An Angry Customer
Introduction
Most tickets received by an average support desk are pleasant to slightly-not-pleasant in tone. But occasionally a ticket shows up from a customer who is very irate and angry. And sometimes that ticket might sit for a while before someone gets to it - which of course leaves the angry customer steaming even more. Wouldn't it be great if there was a way to get an alert when a ticket with a clearly negative or angry tone was submitted?
In this age of machine learning and artificial intelligence algorithms, it is now possible to do exactly that. And in this article we'll show you exactly how. Don't let the words "machine learning" or "artificial intelligence" throw you off - its pretty easy to do these days as long as you have the proper tools. Numerous services are now available that allow you to integrate AI technologies in ways that abstract the underlying complexity away from your view.
Getting Started
To get started you need these four things:
- Awesome Support already installed on your WordPress site
- The BUSINESS RULES ENGINE add-on for Awesome Support
- A Zapier account
- A MonkeyLearn account (the free tier should be enough for most smaller businesses)
The way the data flow works is like this: when a ticket is received the Awesome Support Business Rules Engine will send the ticket contents to Zapier. Zapier in turn will send the data to MonkeyLearn.com which will use its algorithms to analyze the ticket and return a POSITIVE or NEGATIVE flag. If a NEGATIVE flag is returned, Zapier will generate an email and send it to one or more email addresses that you specify.
So, before you get started, you should sign up for a Zapier account and a MonkeyLearn account if you don't already have one.
Step #1: Set up a skeleton zap in Zapier
This skeleton Zap allows us to get the "hook" needed for configuring the business rules engine and linking it to Zapier.
- Log on to Zapier
- Click the bright orange button at the top of the screen labeled MAKE A ZAP
- In the list of apps that is shown select WEBHOOKS. If Webhooks isn’t shown search for it in the search box and then select it
- Click on the radio button labeled CATCH HOOK and then click the blue SAVE + CONTINUE button.
- When presented with the PICK Off A Child Key option, skip this for now and click the CONTINUE button.
- You will be presented with a url that is the “hook”. Copy it to your clipboard and store it in a notepad so that you can use it later.
Step #2: Set up the Ruleset
Now that you have a webhook from Zapier you can tell the ruleset about it.
- Create a new RULESET (AS RULESET->ADD NEW RULESET)
- Select NEW TICKET as the trigger.
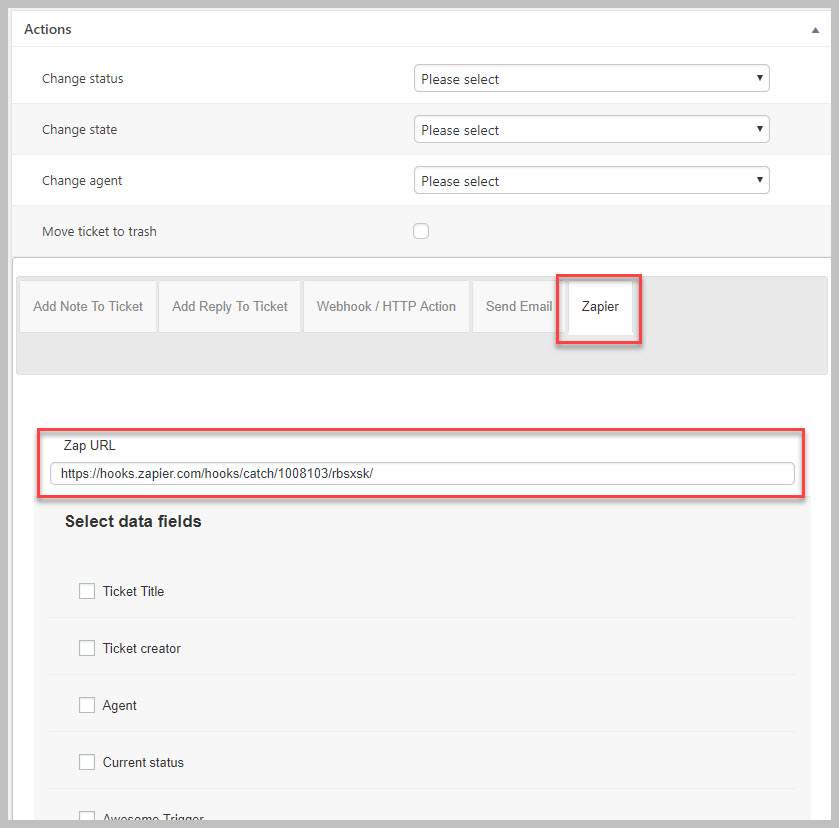
- In the actions section at the bottom of the screen click the ZAPIER tab
- In the ZAP URL field enter the webhook you retrieved
- Check off the data fields you would like to send to Zapier (we generally just choose them all)
- Click the UPDATE or PUBLISH button
- Scroll back down and click the SEND TEST ZAP button.
Step #3: Continue Setting Up Data in Zapier
- Switch back over to your Zapier screen and then click the OK, I DID THIS button. Zapier will search for the test data being sent
- If Zapier finds the test data sent it will give you a TEST SUCCESSFUL message and you can then click the CONTINUE button.
Step #4: Set up Monkey Learn Link From Zapier
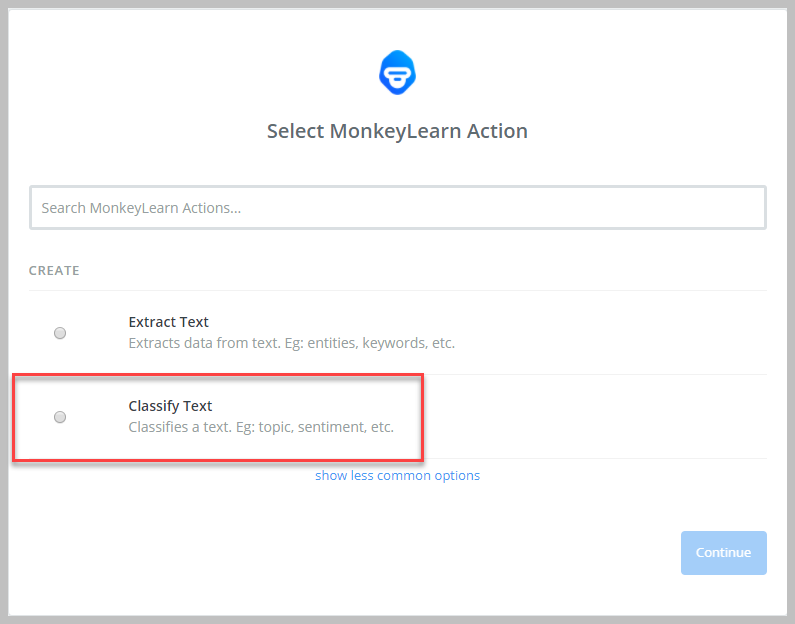
- You should now be asked to choose an ACTION APP (still in Zapier). Search for MONKEYLEARN. Once you find it, just click on it.
- You will be presented with two choices. Select CLASSIFY TEXT and click the blue CONTINUE button.
- The next screen will ask you to connect to your MonkeyLearn account (or select an existing one if you've already connected one to your Zapier account). Assuming that you need to connect your account, you will be asked for your MonkeyLearn API KEY - you can get this from your MONKEYLEARN account screen. Copy and paste it into the Zapier dialog box and then click the orange YES, CONTINUE button.

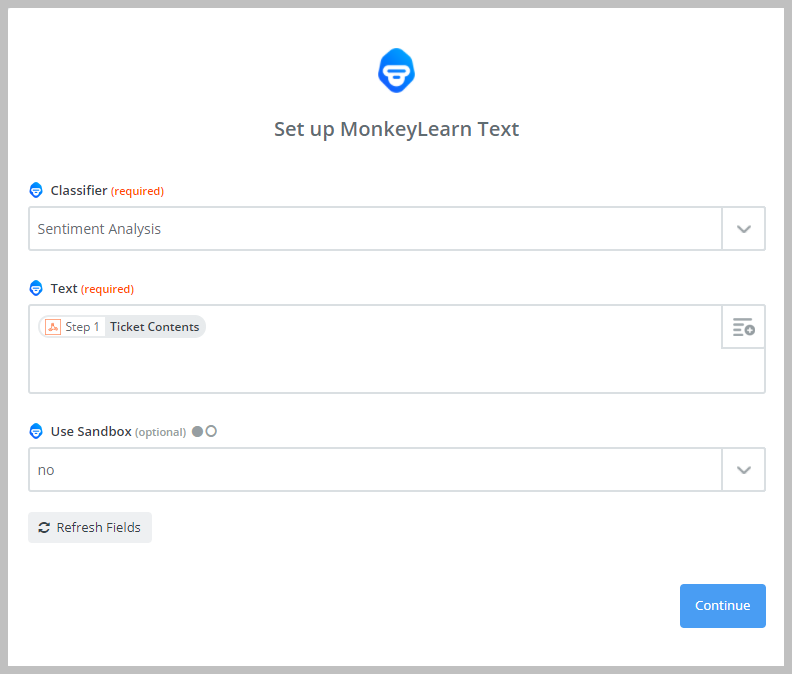
Now you need to select the data to be sent to MonkeyLearn.
- For the Classifier choose SENTIMENT ANALYSIS. (Click the arrow on the Classifer drop-down field to see the list).
- For the Text, click the "+" sign on the field and select TICKET CONTENTS.
- Click the blue CONTINUE button.
- You will be asked to approve a test. click the blue CREATE & CONTINUE Button. If all is well you will see a green TEST SUCCESSFUL message.
- At this point, click the ADD A STEP button - its time to set up your email.
Step #5: Set up the Email Alert from Zapier
You should now be back at the CHOOSE AN ACTION APP Zapier dialog box. This time search for EMAIL and then select the EMAIL BY ZAPIER app. (Note: Zapier only allows you to send 10 emails per week so if your volume of tickets is higher you should instead search for your email service provider such as MAILGUN or SENDMAIL).
- Select the only action for the EMAIL app - send outbound mail - and click the SAVE + CONTINUE blue button.
- In this new screen you now need to specify who the email will go to, a subject and the body of the email.
- Enter the email address of the recipient of this alert (most likely yourself for now) in the TO field.
- Enter a subject line in the SUBJECT Field - can be any string of text such as "ALERT: Ticket from angry customer"
- In the BODY field, click the "+" sign and then click the CATCH HOOK option to see a list of ticket fields. You can choose to include the TICKET ID and the TICKET CONTENTS. You can also add other text in the field to format the email to make it look presentable.
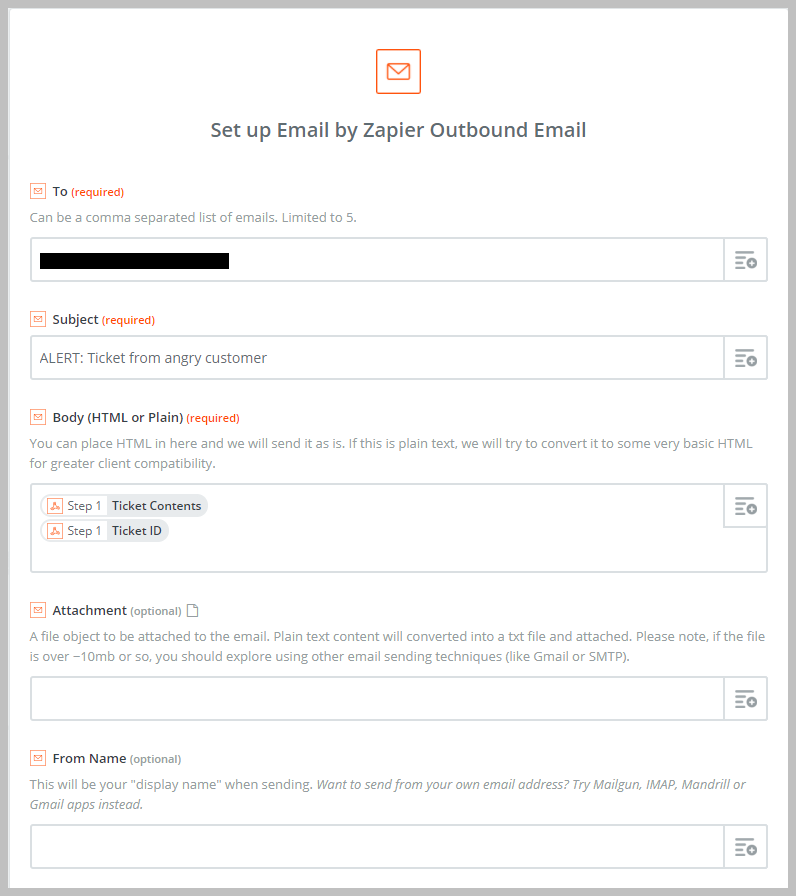
- Scroll down and click the blue CONTINUE button.
- On the next screen click the CREATE & CONTINUE button.
- Finally, click the orange FINISH button.
- Click the radio button to turn on your ZAP.
Step #6: Create a test ticket
At this point, you should be able to create a test ticket in Awesome Support and receive an email from Zapier. You will receive an email for EVERY TICKET sent because we didn't set up a filter for just negative responses. We'll do that next. For now you should be receiving an email from Zapier for every ticket you create. This will let you know that the set up is working correctly.
Step #7: Set up Filters
Now, lets go back into Zapier and make sure you only receive emails for tickets that are deemed to be negative by MonkeyLearn's algorithms.
- Log into Zapier and go to your dashboard.
- Find your Zap and click on it.
- In the left panel you will see a list of steps and apps included with this Zap.
- Just before the last step you'll see a plus sign "+". Click on it.
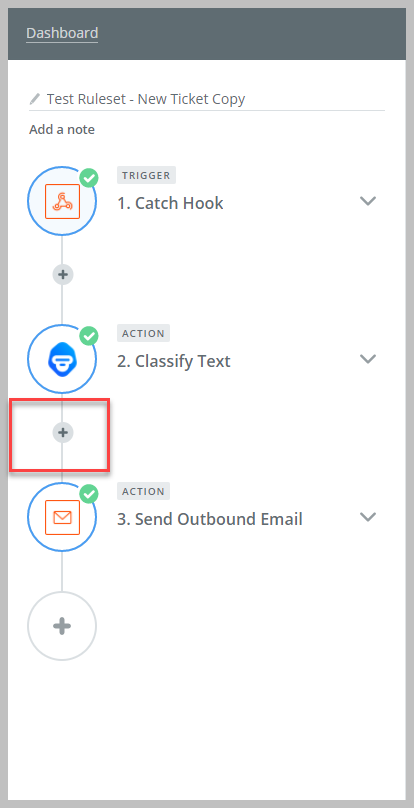
- Clicking on the plus sign gives you a choice of an ACTION or a FILTER. Select FILTER
- Click the blue SAVE + CONTINUE button
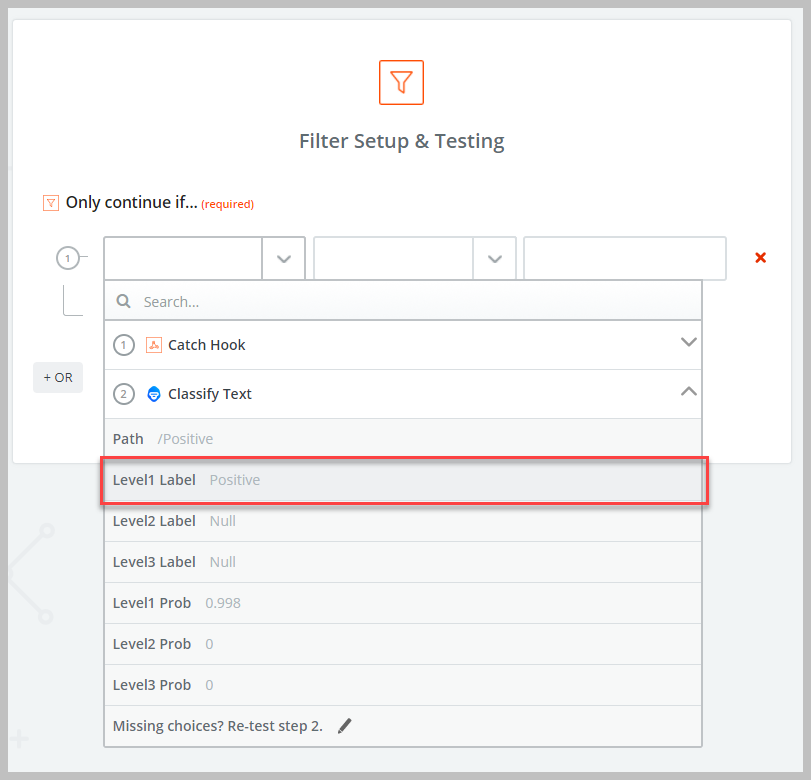
- You will see one row with three columns. In the first column click the drop-down then select CLASSIFY TEXT followed by LEVEL1 LABEL
- In the second column choose (Text) Contains

- In the third column, just type the word Negative.
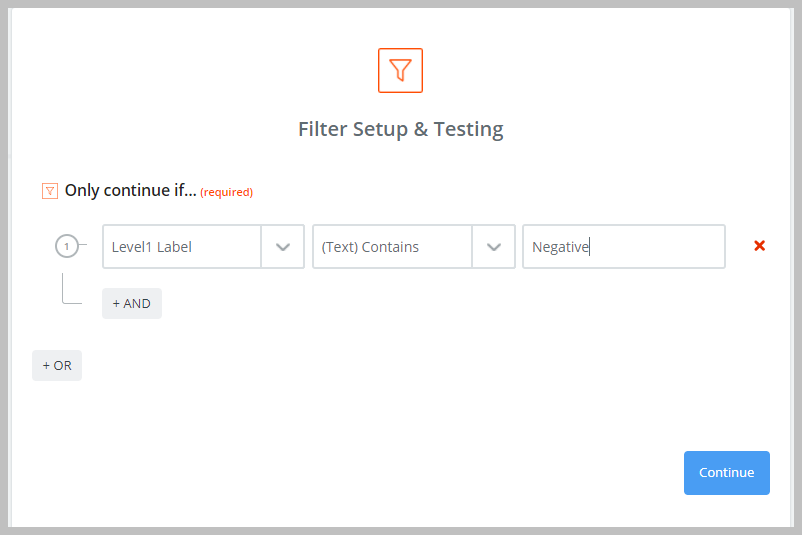
- Click the blue CONTINUE button.
- Click the blue TEST FILTER button. You might get a Pass or Fail message here depending on what your test data contained from the first part of this tutorial. If it fails don't worry too much since it probably means that your test data contained a ticket with a positive tone instead of a negative one.
- Click the orange CONTINUE button.
- Go back to your dashboard and verify that your ZAP is turned on. If its not, just turn it on.
- Submit a test ticket with a clearly negative tone and make sure you get an email alert.
Wrap Up
Machine learning and Artificial Intelligence is now at a point where the average user can make use of the technology. With Awesome Support's rules engine and Zapier integration, this technology is now easily available to your help desk operations. You should explore MonkeyLearn and services like it to see what other potential there is for stream-lining your support operations. This is just a glimpse of what is possible with the new AI technologies - we intend to continue pushing forward in exploring these new services so we can bring you awesome new ideas to work with!
THREE EASY WAYS TO GET STARTED WITH AWESOME SUPPORT TODAY!
Purchase A Bundle
Download Free Plugin
Install From WordPress.org